mirror of
https://github.com/AstrBotDevs/AstrBot
synced 2026-07-16 17:47:06 +08:00
 aace90daab
* feat(lark): implement app registration and bot info retrieval

- Add app registration functionality for Lark and Feishu platforms, including endpoints and request handling.
- Introduce polling mechanism for app registration status.
- Create bot info retrieval functionality to fetch bot details after successful registration.
- Enhance dashboard with new UI components for one-click QR setup and manual setup options.
- Update internationalization files to support new features and actions.
- Add unit tests for app registration endpoint resolution and data handling.

* feat(weixin_oc): add WeChat login registration and QR code handling
152 lines
7.5 KiB
Markdown
152 lines
7.5 KiB
Markdown
# Connecting to Lark
|
|
|
|
## Supported Message Types
|
|
|
|
> Version v4.15.0.
|
|
|
|
| Message Type | Receive Support | Send Support | Notes |
|
|
| --- | --- | --- | --- |
|
|
| Text | Yes | Yes | |
|
|
| Image | Yes | Yes | |
|
|
| Voice | No | Yes | |
|
|
| Video | No | Yes | |
|
|
| File | No | Yes | |
|
|
|
|
Proactive message push: Supported.
|
|
|
|
Streaming output: Supported. You must enable the `Create and update cards (cardkit:card:write)` permission for your app in the Lark Developer Console.
|
|
|
|
The Lark client version must be >= 7.20. Lower versions only display the title and an upgrade prompt.
|
|
|
|
## Creating a Bot
|
|
|
|
Lark supports two setup methods: one-click QR creation in AstrBot, or manually creating a custom enterprise app in the Lark Developer Console.
|
|
|
|
### Option 1: One-click QR Creation
|
|
|
|
AstrBot version requirement: >= 4.25.0.
|
|
|
|
Open the AstrBot management panel, click `Bots` in the left sidebar, click `+ Create Bot`, and select `lark`.
|
|
|
|
Under `Creation Method`, select `One-click QR Creation`, choose the China or international edition as needed, then scan the QR code with the Lark mobile app and confirm. After creation succeeds, AstrBot automatically fills in the app's `app_id`, `app_secret`, and domain configuration.
|
|
|
|
> [!IMPORTANT]
|
|
> After an app is created through QR scanning, group chats receive only messages that @ mention the bot or messages triggered by a wake prefix such as `/` by default. If you need the bot to receive all group messages, enable the additional permissions in the Lark Developer Console.
|
|
>
|
|
> Replace `<APP_ID>` in the URL below with your Lark app ID, then open it to jump to the permission enablement page:
|
|
>
|
|
> To find the App ID, go back to AstrBot's `Bots` page, find the Lark bot you just created, click `Edit`, and check the dialog that opens.
|
|
>
|
|
> ```text
|
|
> https://open.feishu.cn/app/<APP_ID>/auth?q=contact:contact.base:readonly,im:message.p2p_msg:readonly,im:message.group_at_msg:readonly,im:message:send,im:message,im:message:send_as_bot,im:resource:upload,im:resource,cardkit:card:write,im:message.group_at_msg:readonly,im:message.group_msg&op_from=openapi&token_type=tenant
|
|
> ```
|
|
|
|
After QR creation succeeds, continue checking the event subscription, permissions, version release, and group installation steps below.
|
|
|
|
### Option 2: Manual Creation
|
|
|
|
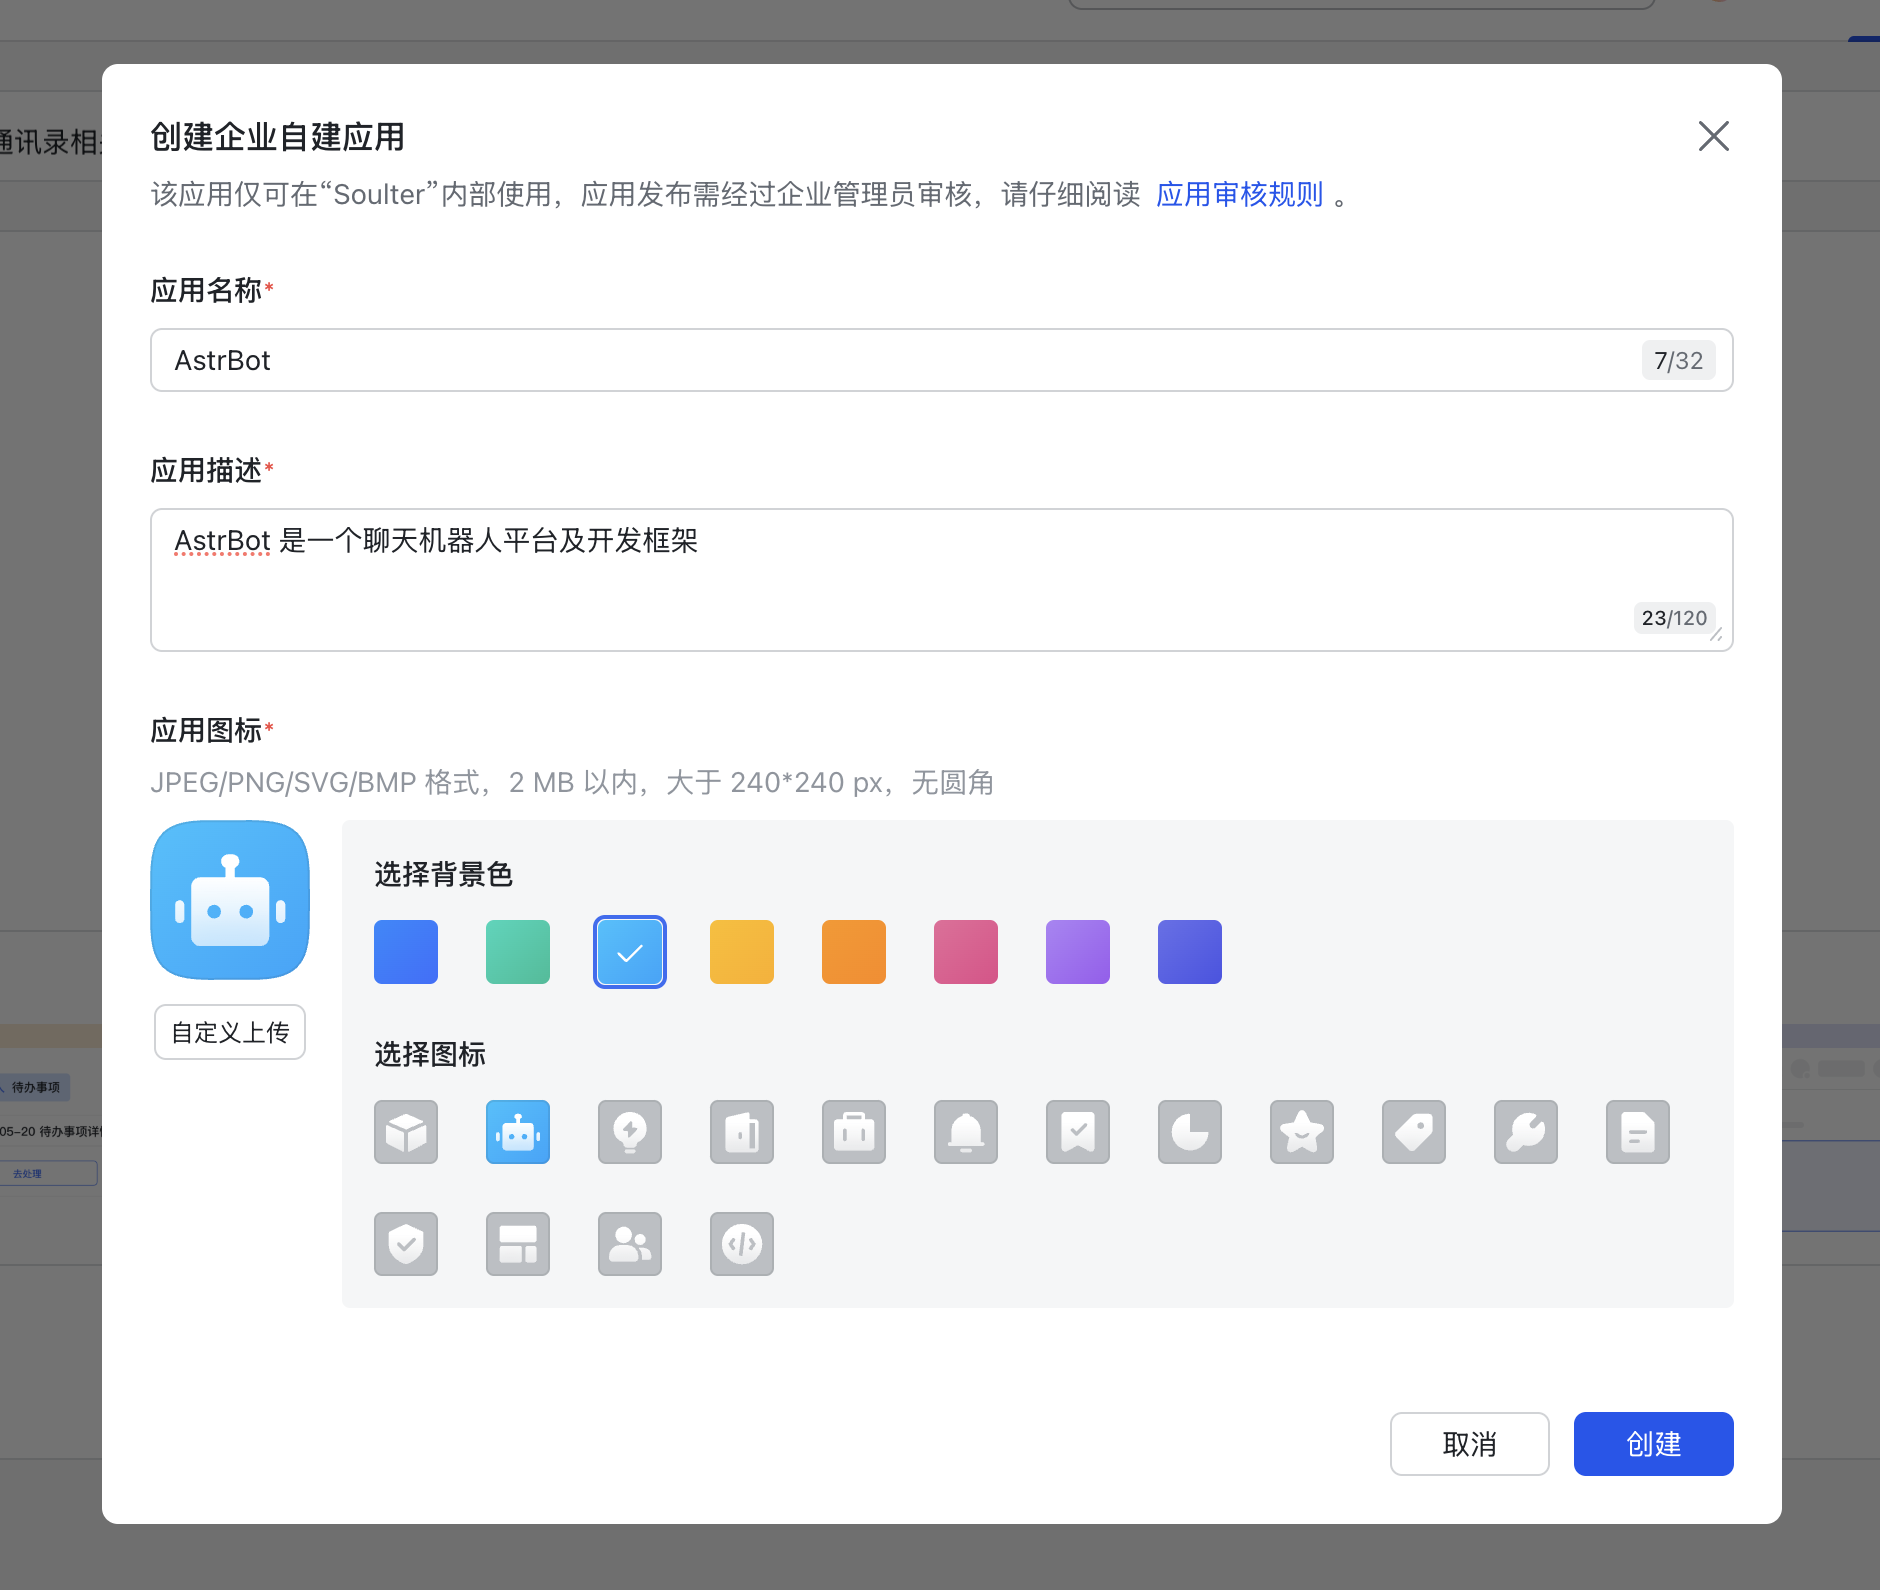
Navigate to the [Developer Console](https://open.feishu.cn/app) and create a custom enterprise application.
|
|
|
|
|
|
|
|
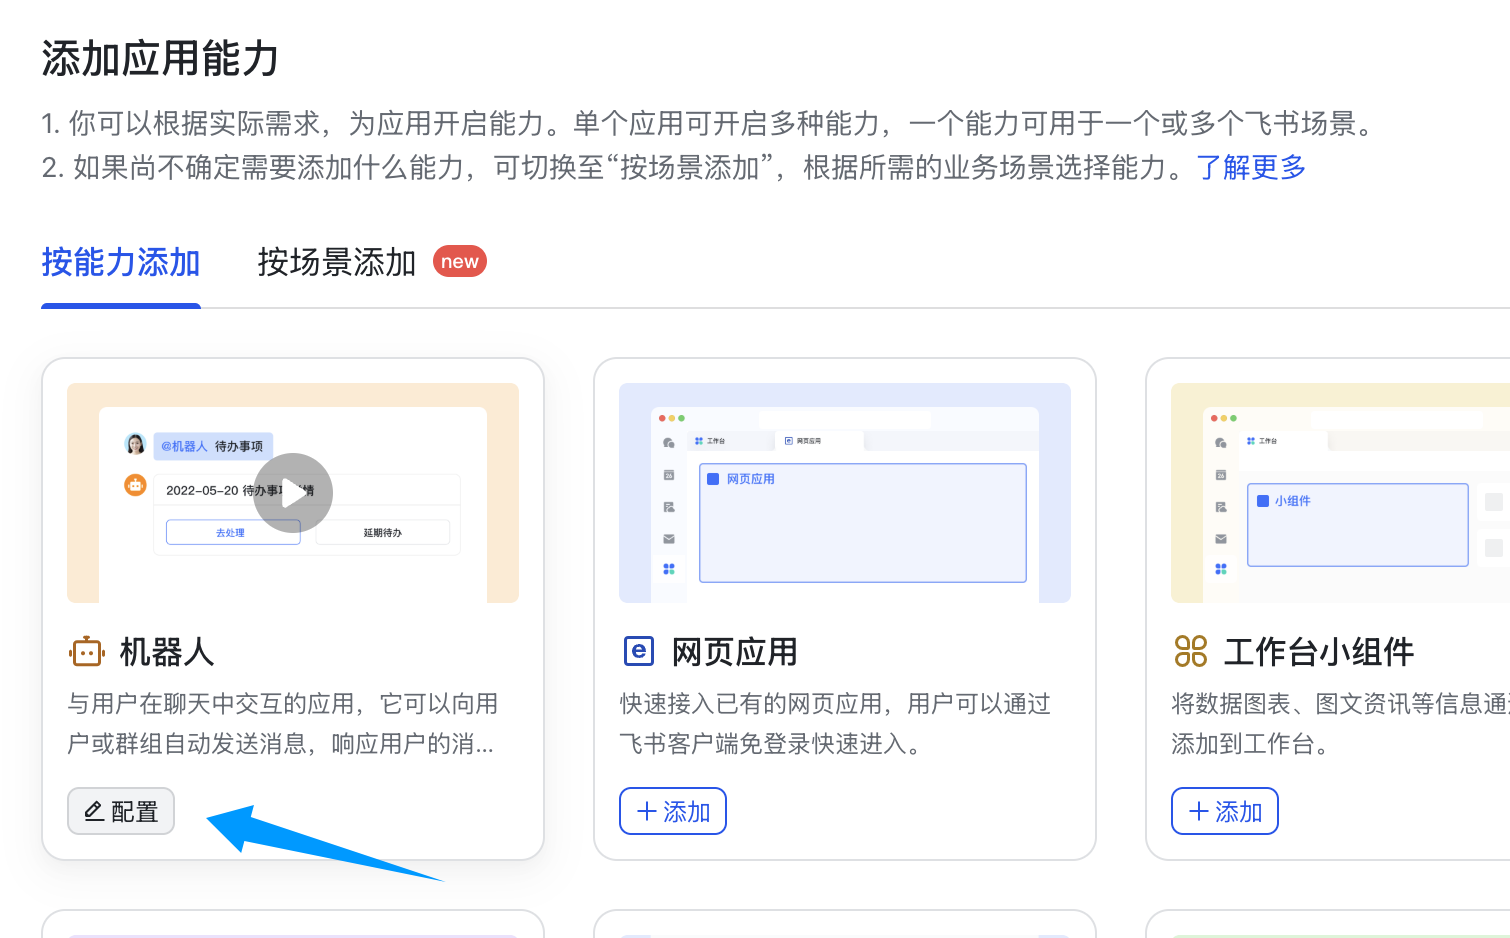
Add the Bot capability to your application.
|
|
|
|
|
|
|
|
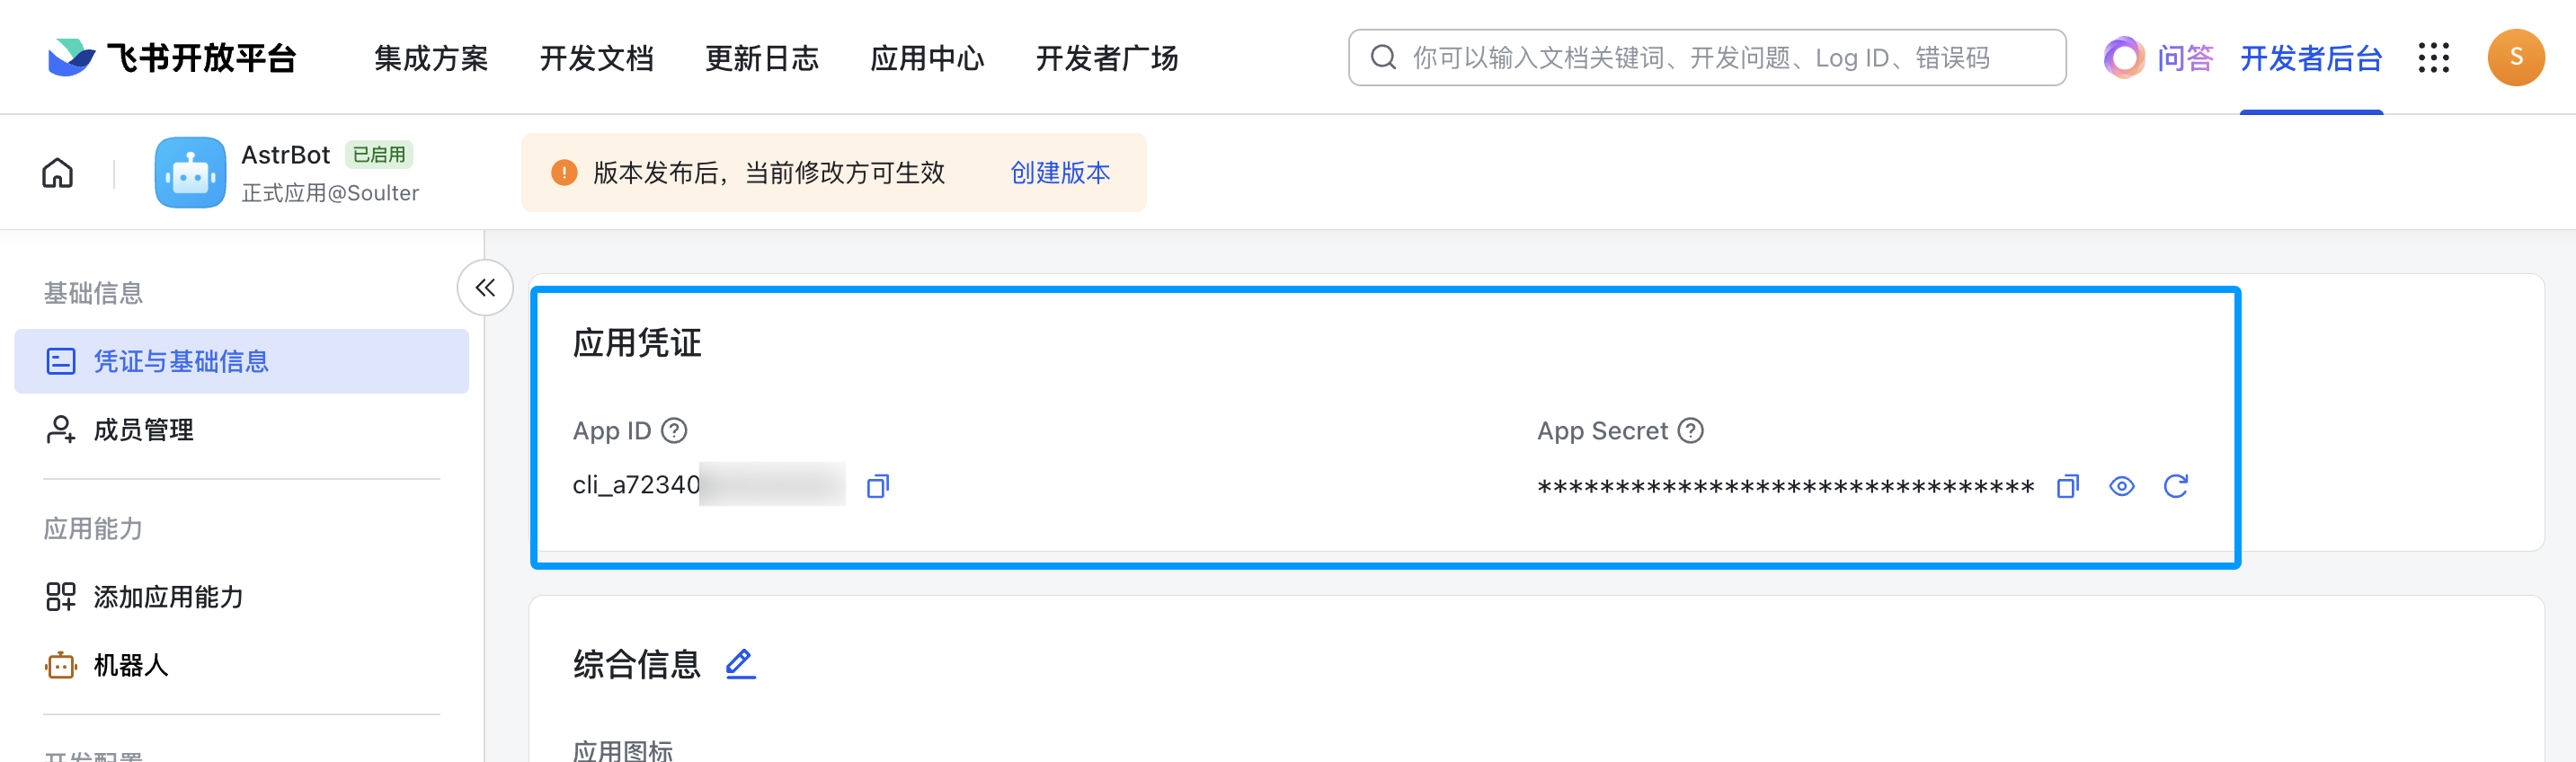
Click on "Credentials & Basic Info" to obtain your app_id and app_secret.
|
|
|
|
|
|
|
|
## Configuring AstrBot
|
|
|
|
1. Access the AstrBot management panel
|
|
2. Click on `Bots` in the left sidebar
|
|
3. In the right panel, click `+ Create Bot`
|
|
4. Select `lark`
|
|
5. If you want AstrBot to create the app for you, select `One-click QR Creation` and complete the scan. If you already created the app yourself, select `Manual Creation`
|
|
|
|
Fill in the configuration fields as follows:
|
|
|
|
- ID: Choose any identifier to distinguish between different messaging platform instances
|
|
- Enable: Check this option
|
|
- app_id: The app_id you obtained earlier
|
|
- app_secret: The app_secret you obtained earlier
|
|
|
|
For the domain field, if you're using Lark China, keep the default value. If you're using Lark International, set it to `https://open.larksuite.com`. If you're using a self-hosted enterprise Lark instance, enter your Lark instance's domain.
|
|
|
|
For the subscription method, `socket` uses a long connection subscription approach, while `webhook` sends events to your developer server and requires a public server. Generally, `socket` is recommended. However, if you're using Lark International or a self-hosted Lark instance, choose `webhook`. The subsequent configuration steps will differ accordingly.
|
|
|
|
If you selected the `webhook` method, navigate to the Lark Developer Console, click on "Events & Callbacks," then "Encryption Policy," and fill in the Encrypt Key. While not mandatory, AstrBot takes your data security seriously, so we strongly recommend setting this up. After filling it in, copy the `Encrypt Key` and `Verification Token` to the corresponding `encrypt_key` and `verification_token` fields in AstrBot's configuration.
|
|
|
|
Click `Save`.
|
|
|
|
## Setting up Callbacks and Permissions
|
|
|
|
The following steps vary depending on the subscription method you selected above. Please proceed to the corresponding section based on your choice.
|
|
|
|
### `socket` Long Connection Method
|
|
|
|
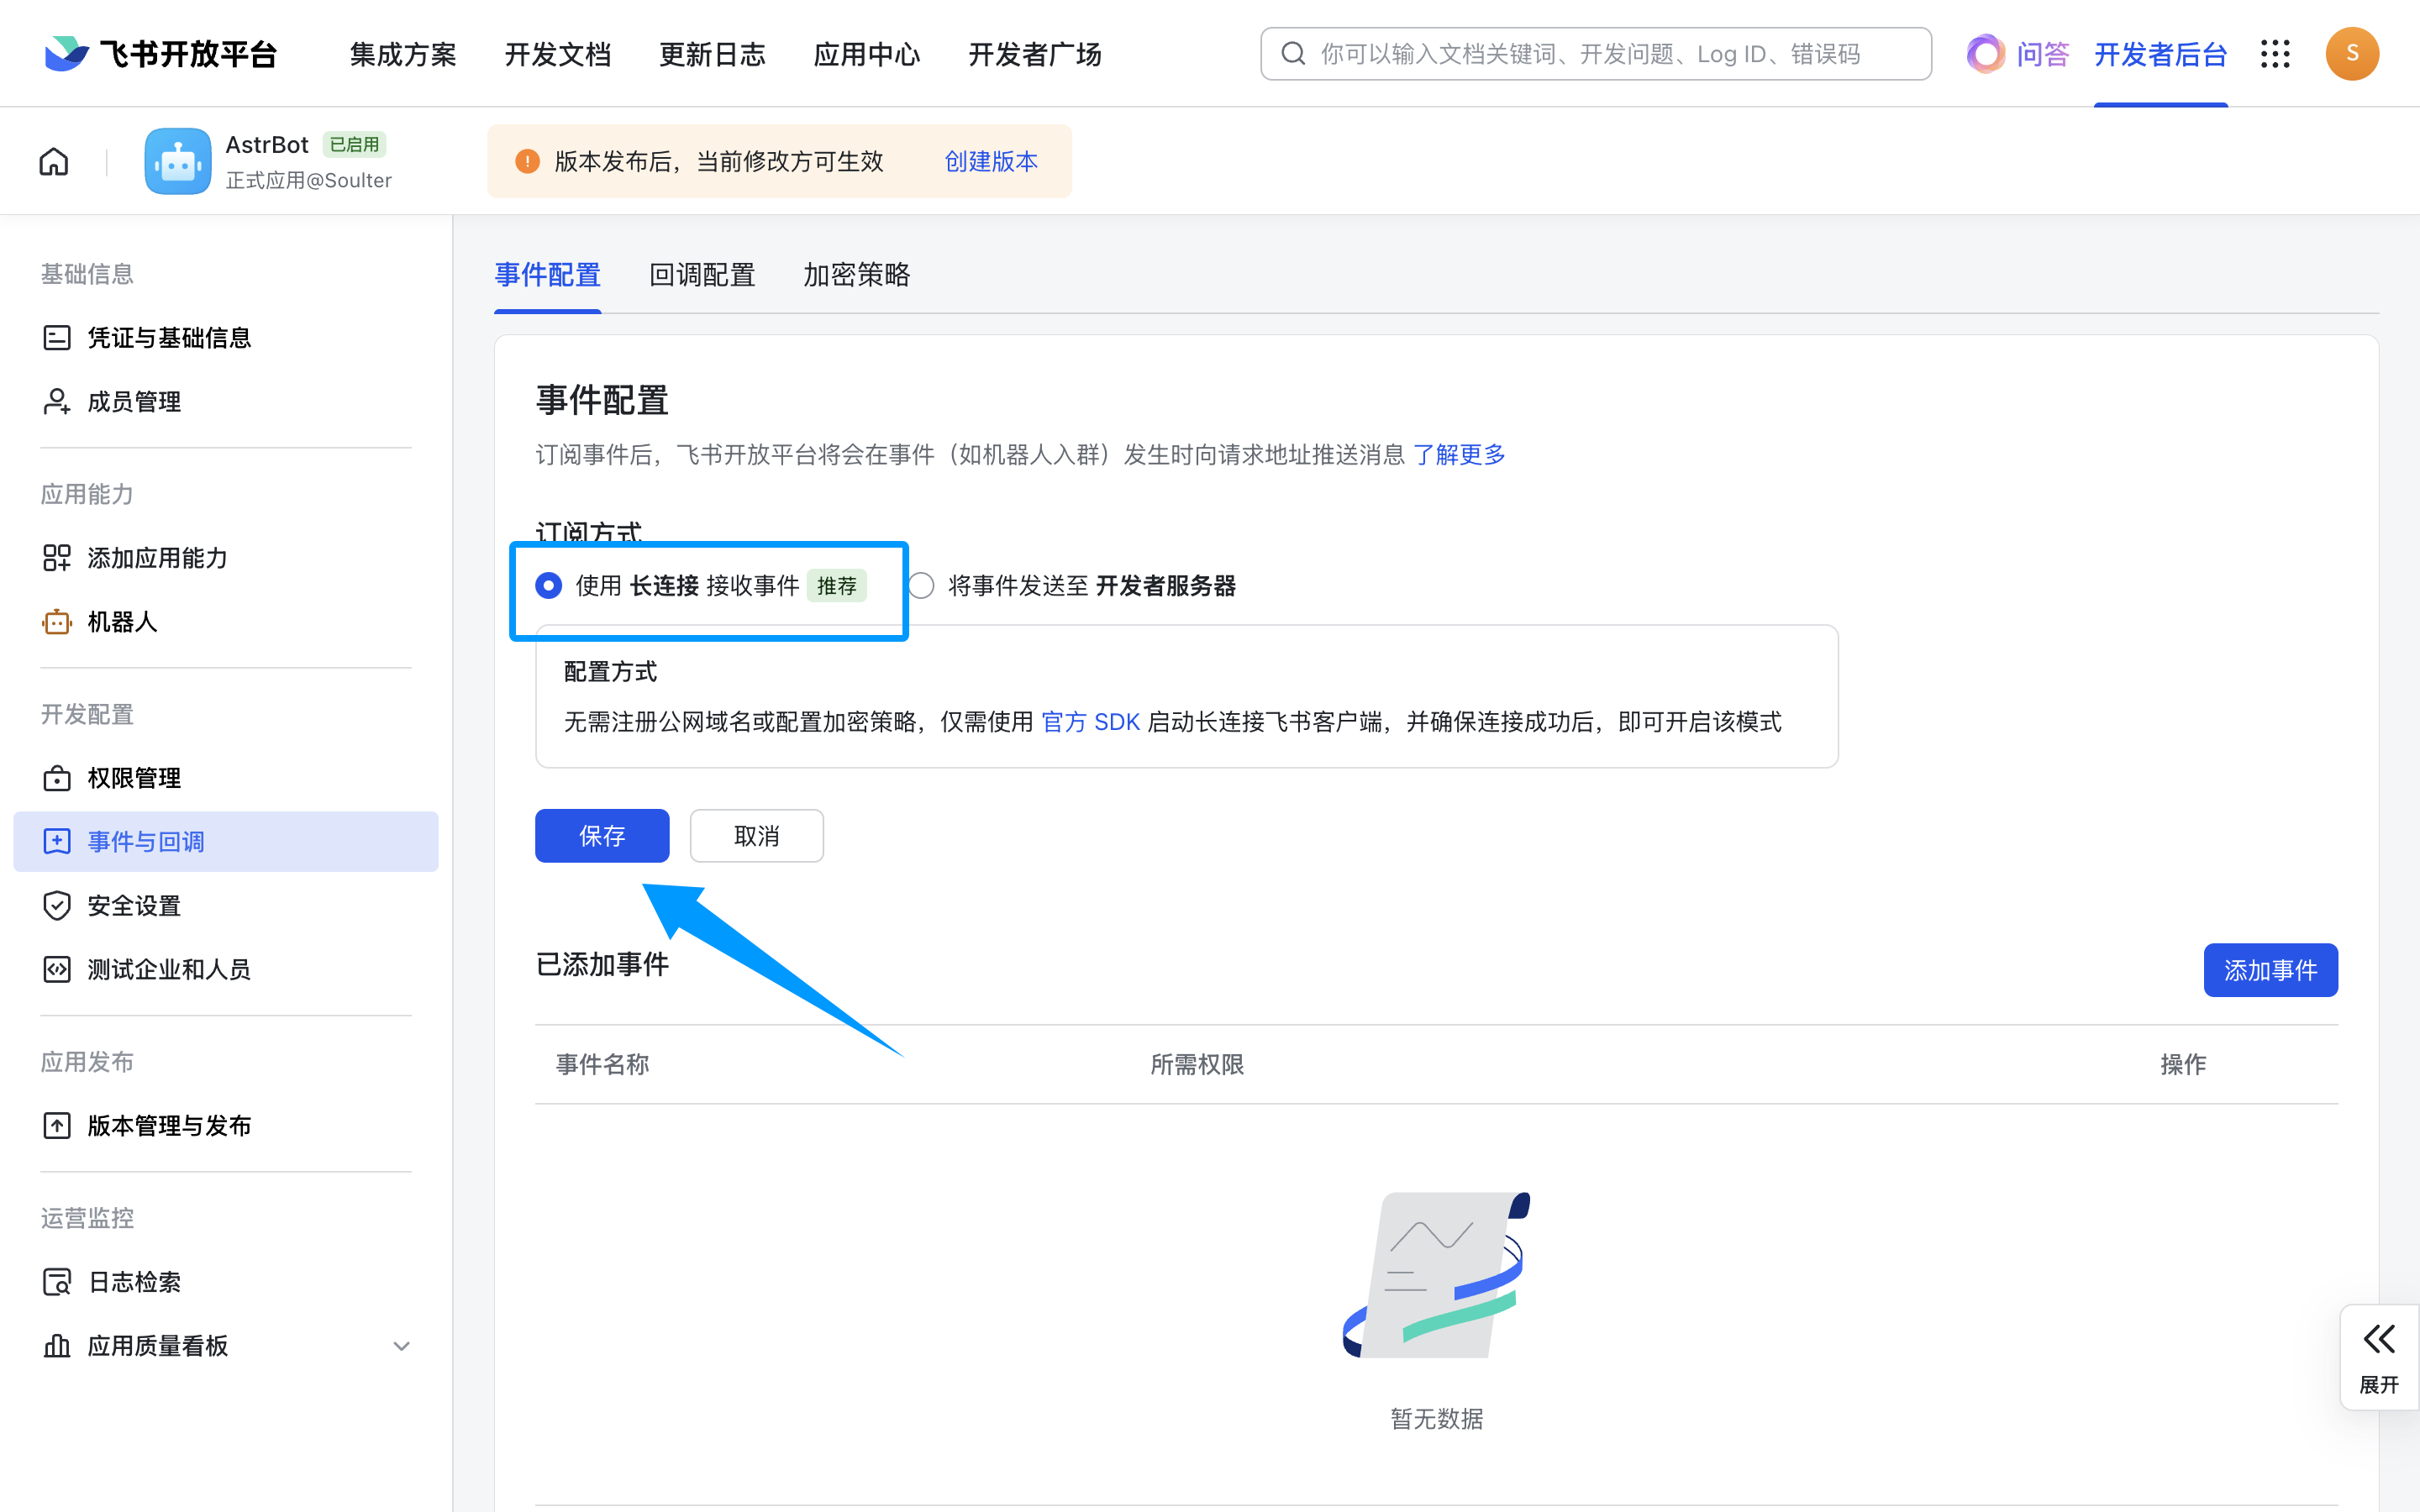
Next, click on "Events & Callbacks," select "Receive events using long connection," and click Save. **If the previous step didn't start successfully, you won't be able to save here.**
|
|
|
|
|
|
|
|
### `webhook` Send Events to Developer Server Method
|
|
|
|
> [!TIP]
|
|
> To make better use of this method, please refer to [Unified Webhook Mode](/en/use/unified-webhook.md#how-to-use-unified-webhook-mode) for the necessary configuration.
|
|
|
|
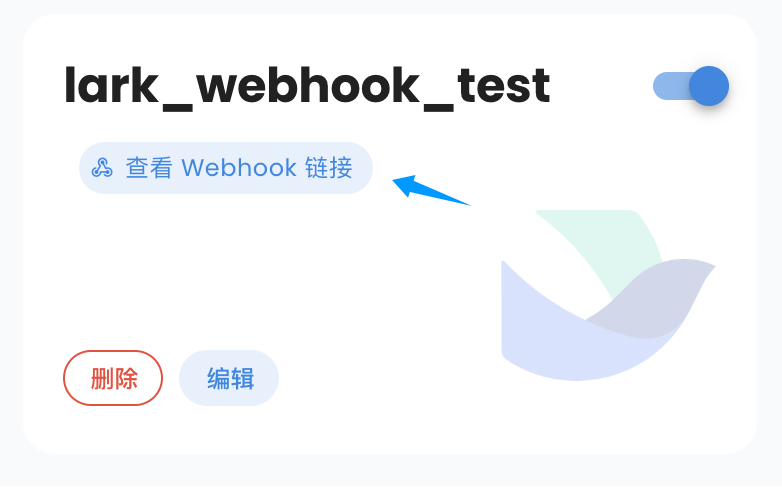
After clicking `Save`, the bot card will display "View Webhook URL." Click to view and copy the callback URL.
|
|
|
|
|
|
|
|
Next, return to Lark's Events & Callbacks page, click "Event Configuration," select "Send events to developer server," enter the callback URL you just copied as the "Request URL," and click Save. If everything is correct, no errors will appear.
|
|
|
|
### Setting up Events
|
|
|
|
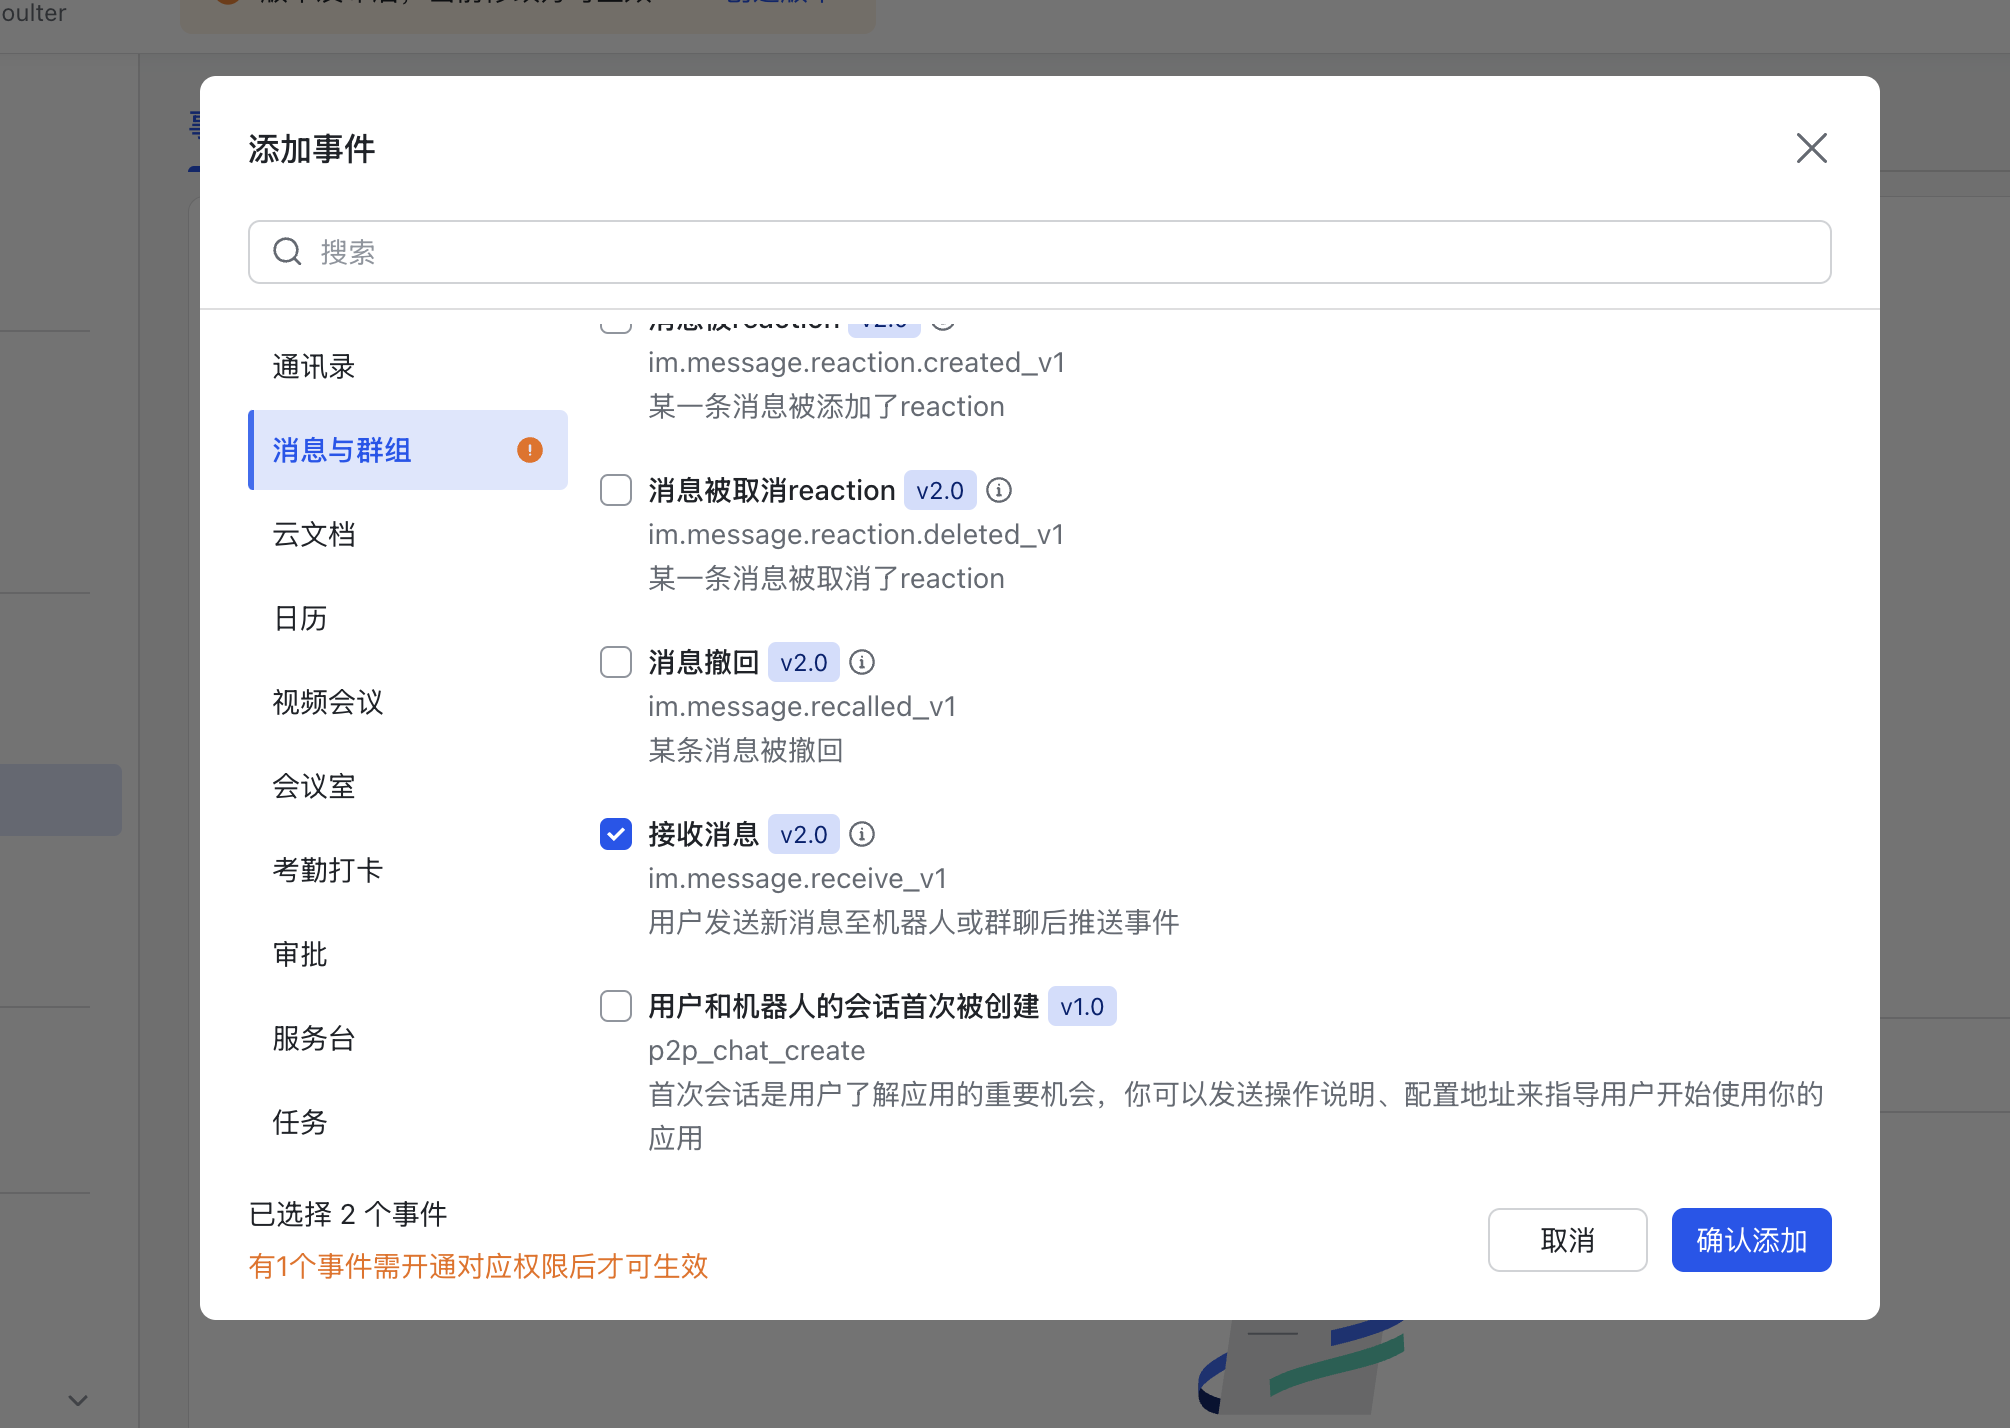
After completing the event configuration in the previous step, click "Add Event," navigate to "Messages & Groups," scroll down to find `Receive Message`, and add it.
|
|
|
|
|
|
|
|
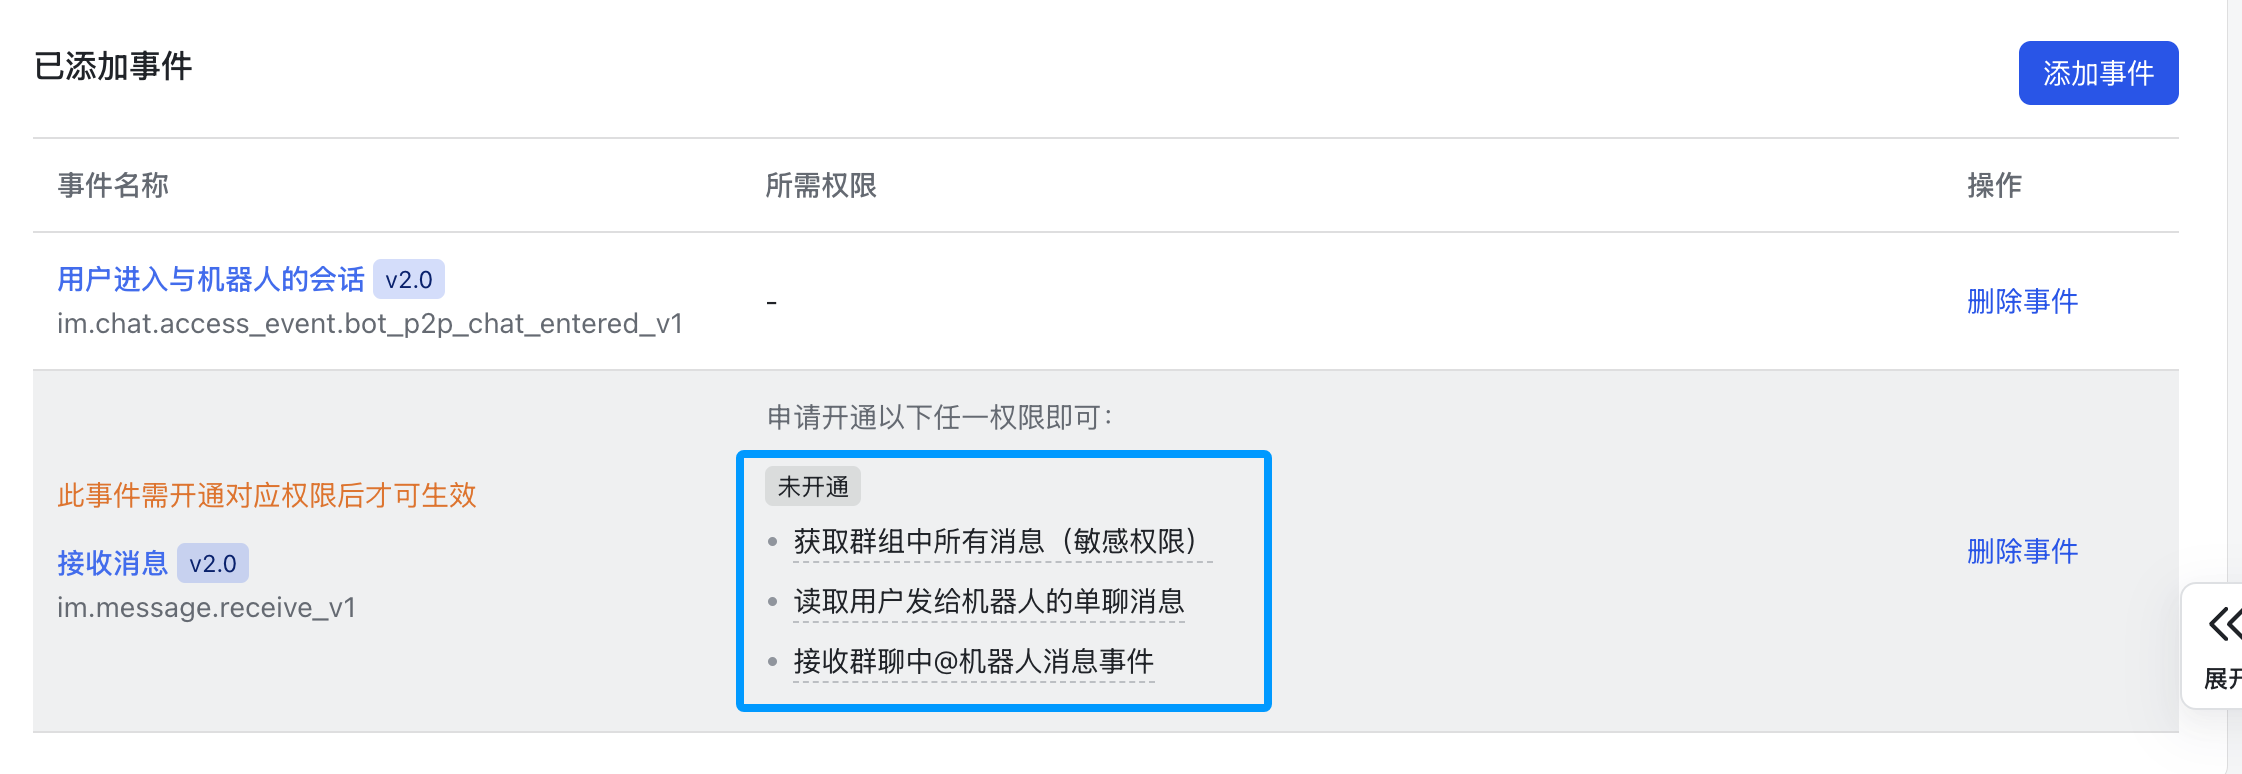
Click to enable the following permissions.
|
|
|
|
|
|
|
|
Then click the `Save` button at the top.
|
|
|
|
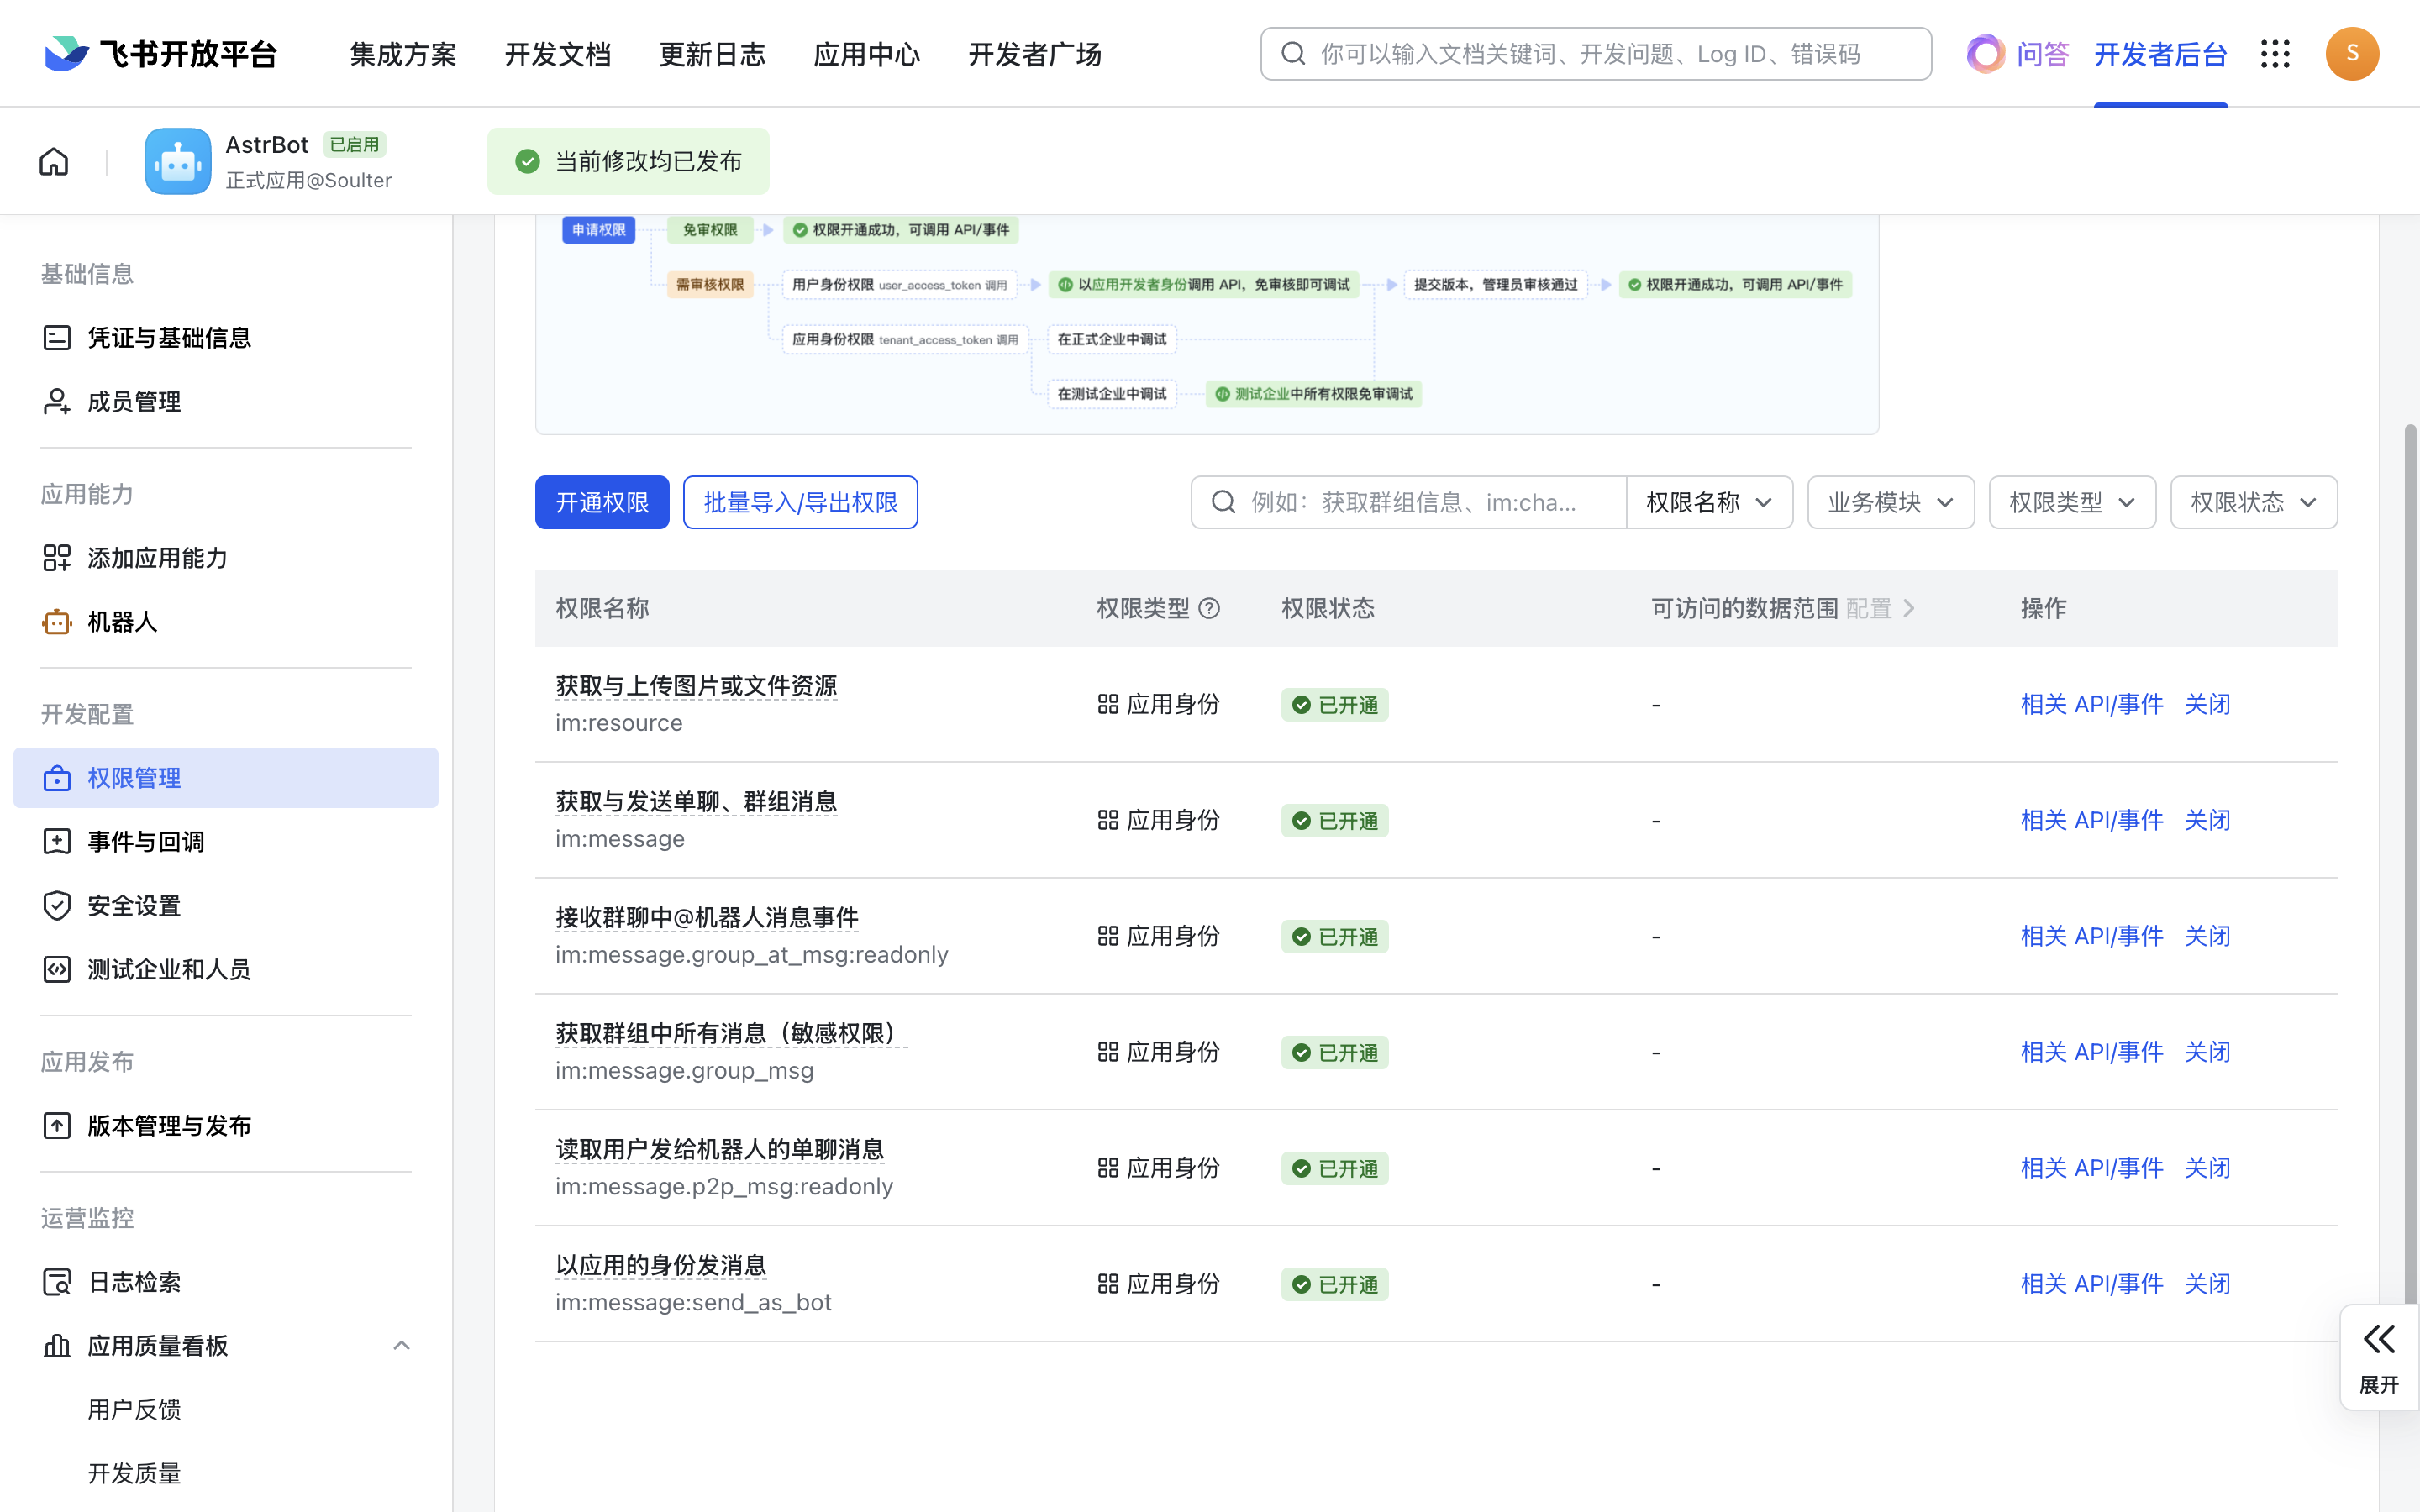
Next, click on "Permission Management," click "Enable Permissions," and enter `im:message:send,im:message,im:message:send_as_bot`. Add the filtered permissions.
|
|
|
|
Enter `im:resource:upload,im:resource` again to enable image upload permissions.
|
|
|
|
If you want to use the bot in group chats, additionally enable `im:message.group_at_msg:readonly` and `im:message.group_msg`.
|
|
|
|
> [!TIP]
|
|
> Apps created through one-click QR creation are suitable for @ mentions and wake-prefix triggers by default. To receive every group message, make sure `im:message.group_msg` is enabled. You can also use the permission URL above to quickly open the corresponding page.
|
|
|
|
If you want to use streaming output, additionally enable `Create and update cards (cardkit:card:write)`.
|
|
|
|
The final set of permissions should look like this:
|
|
|
|
|
|
|
|
## Creating a Version
|
|
|
|
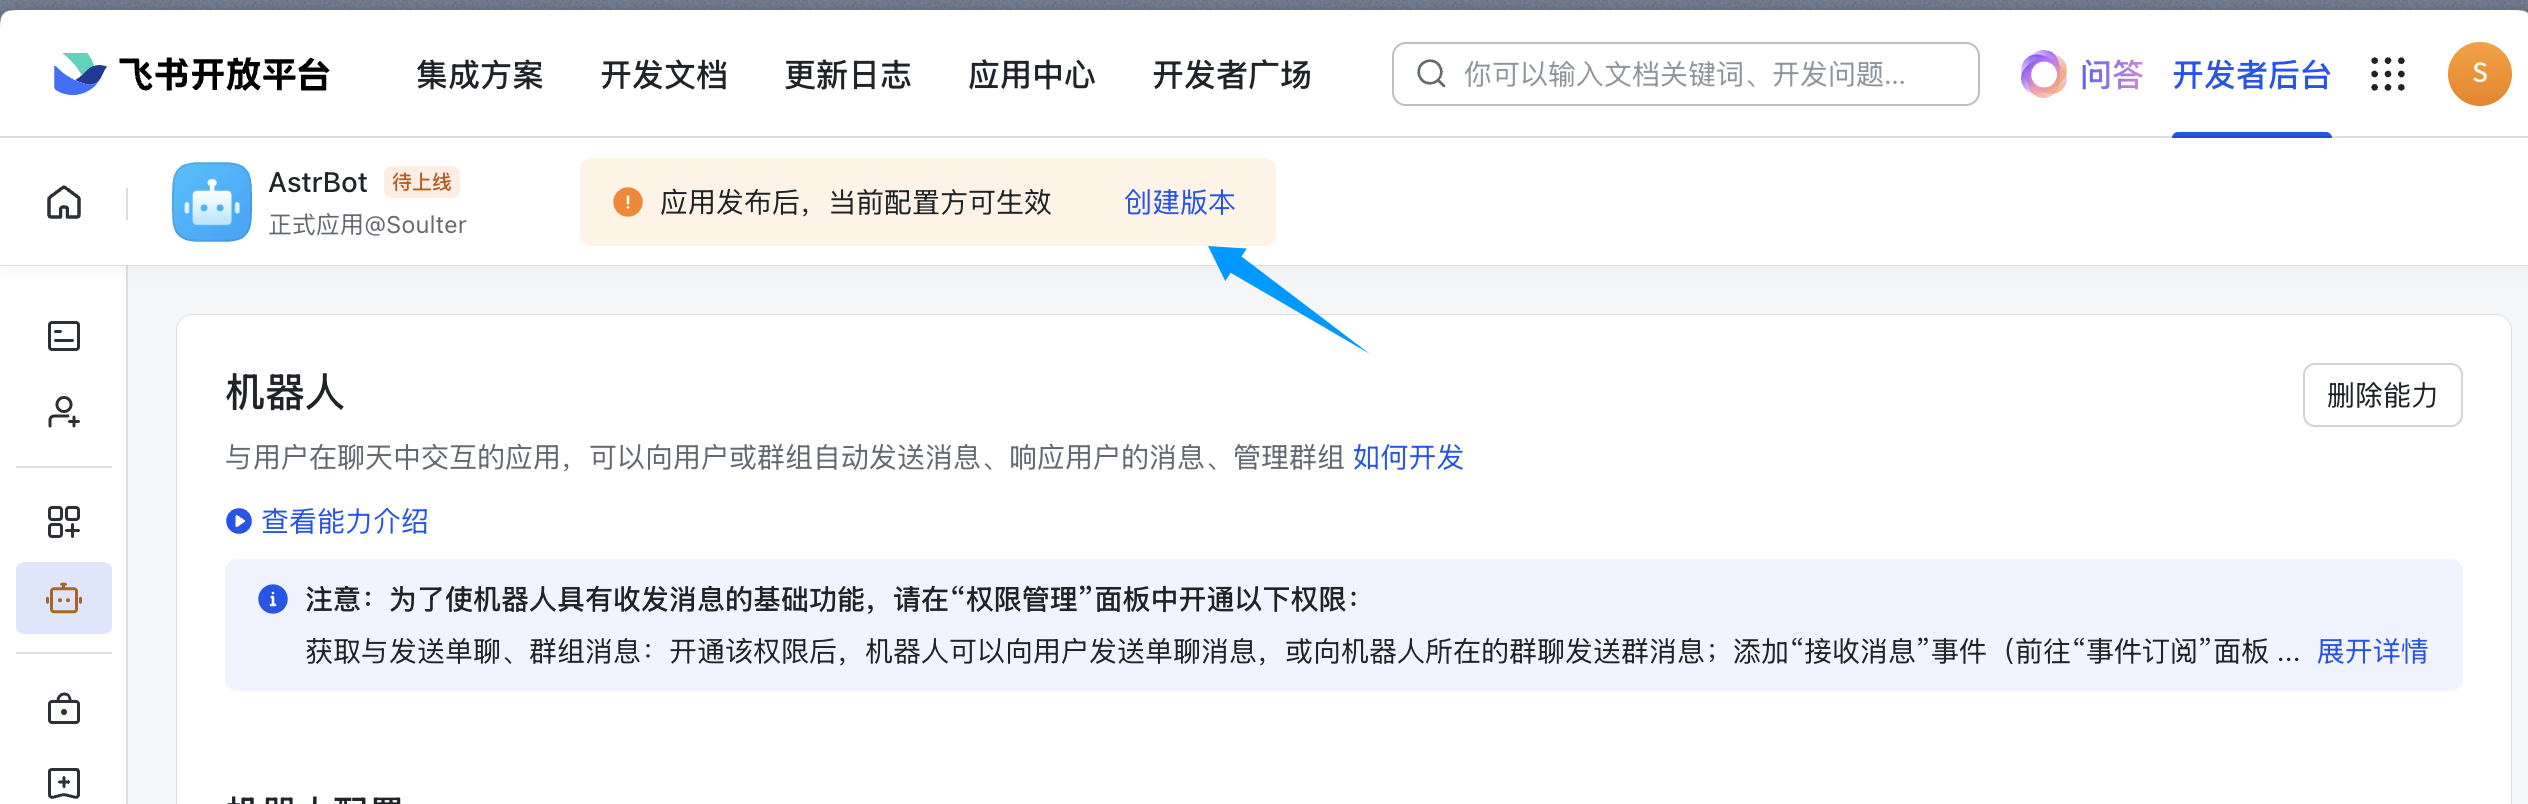
Create a new version.
|
|
|
|
|
|
|
|
Fill in the version number, update notes, and visibility scope, then click Save and confirm the release.
|
|
|
|
## Adding the Bot to a Group
|
|
|
|
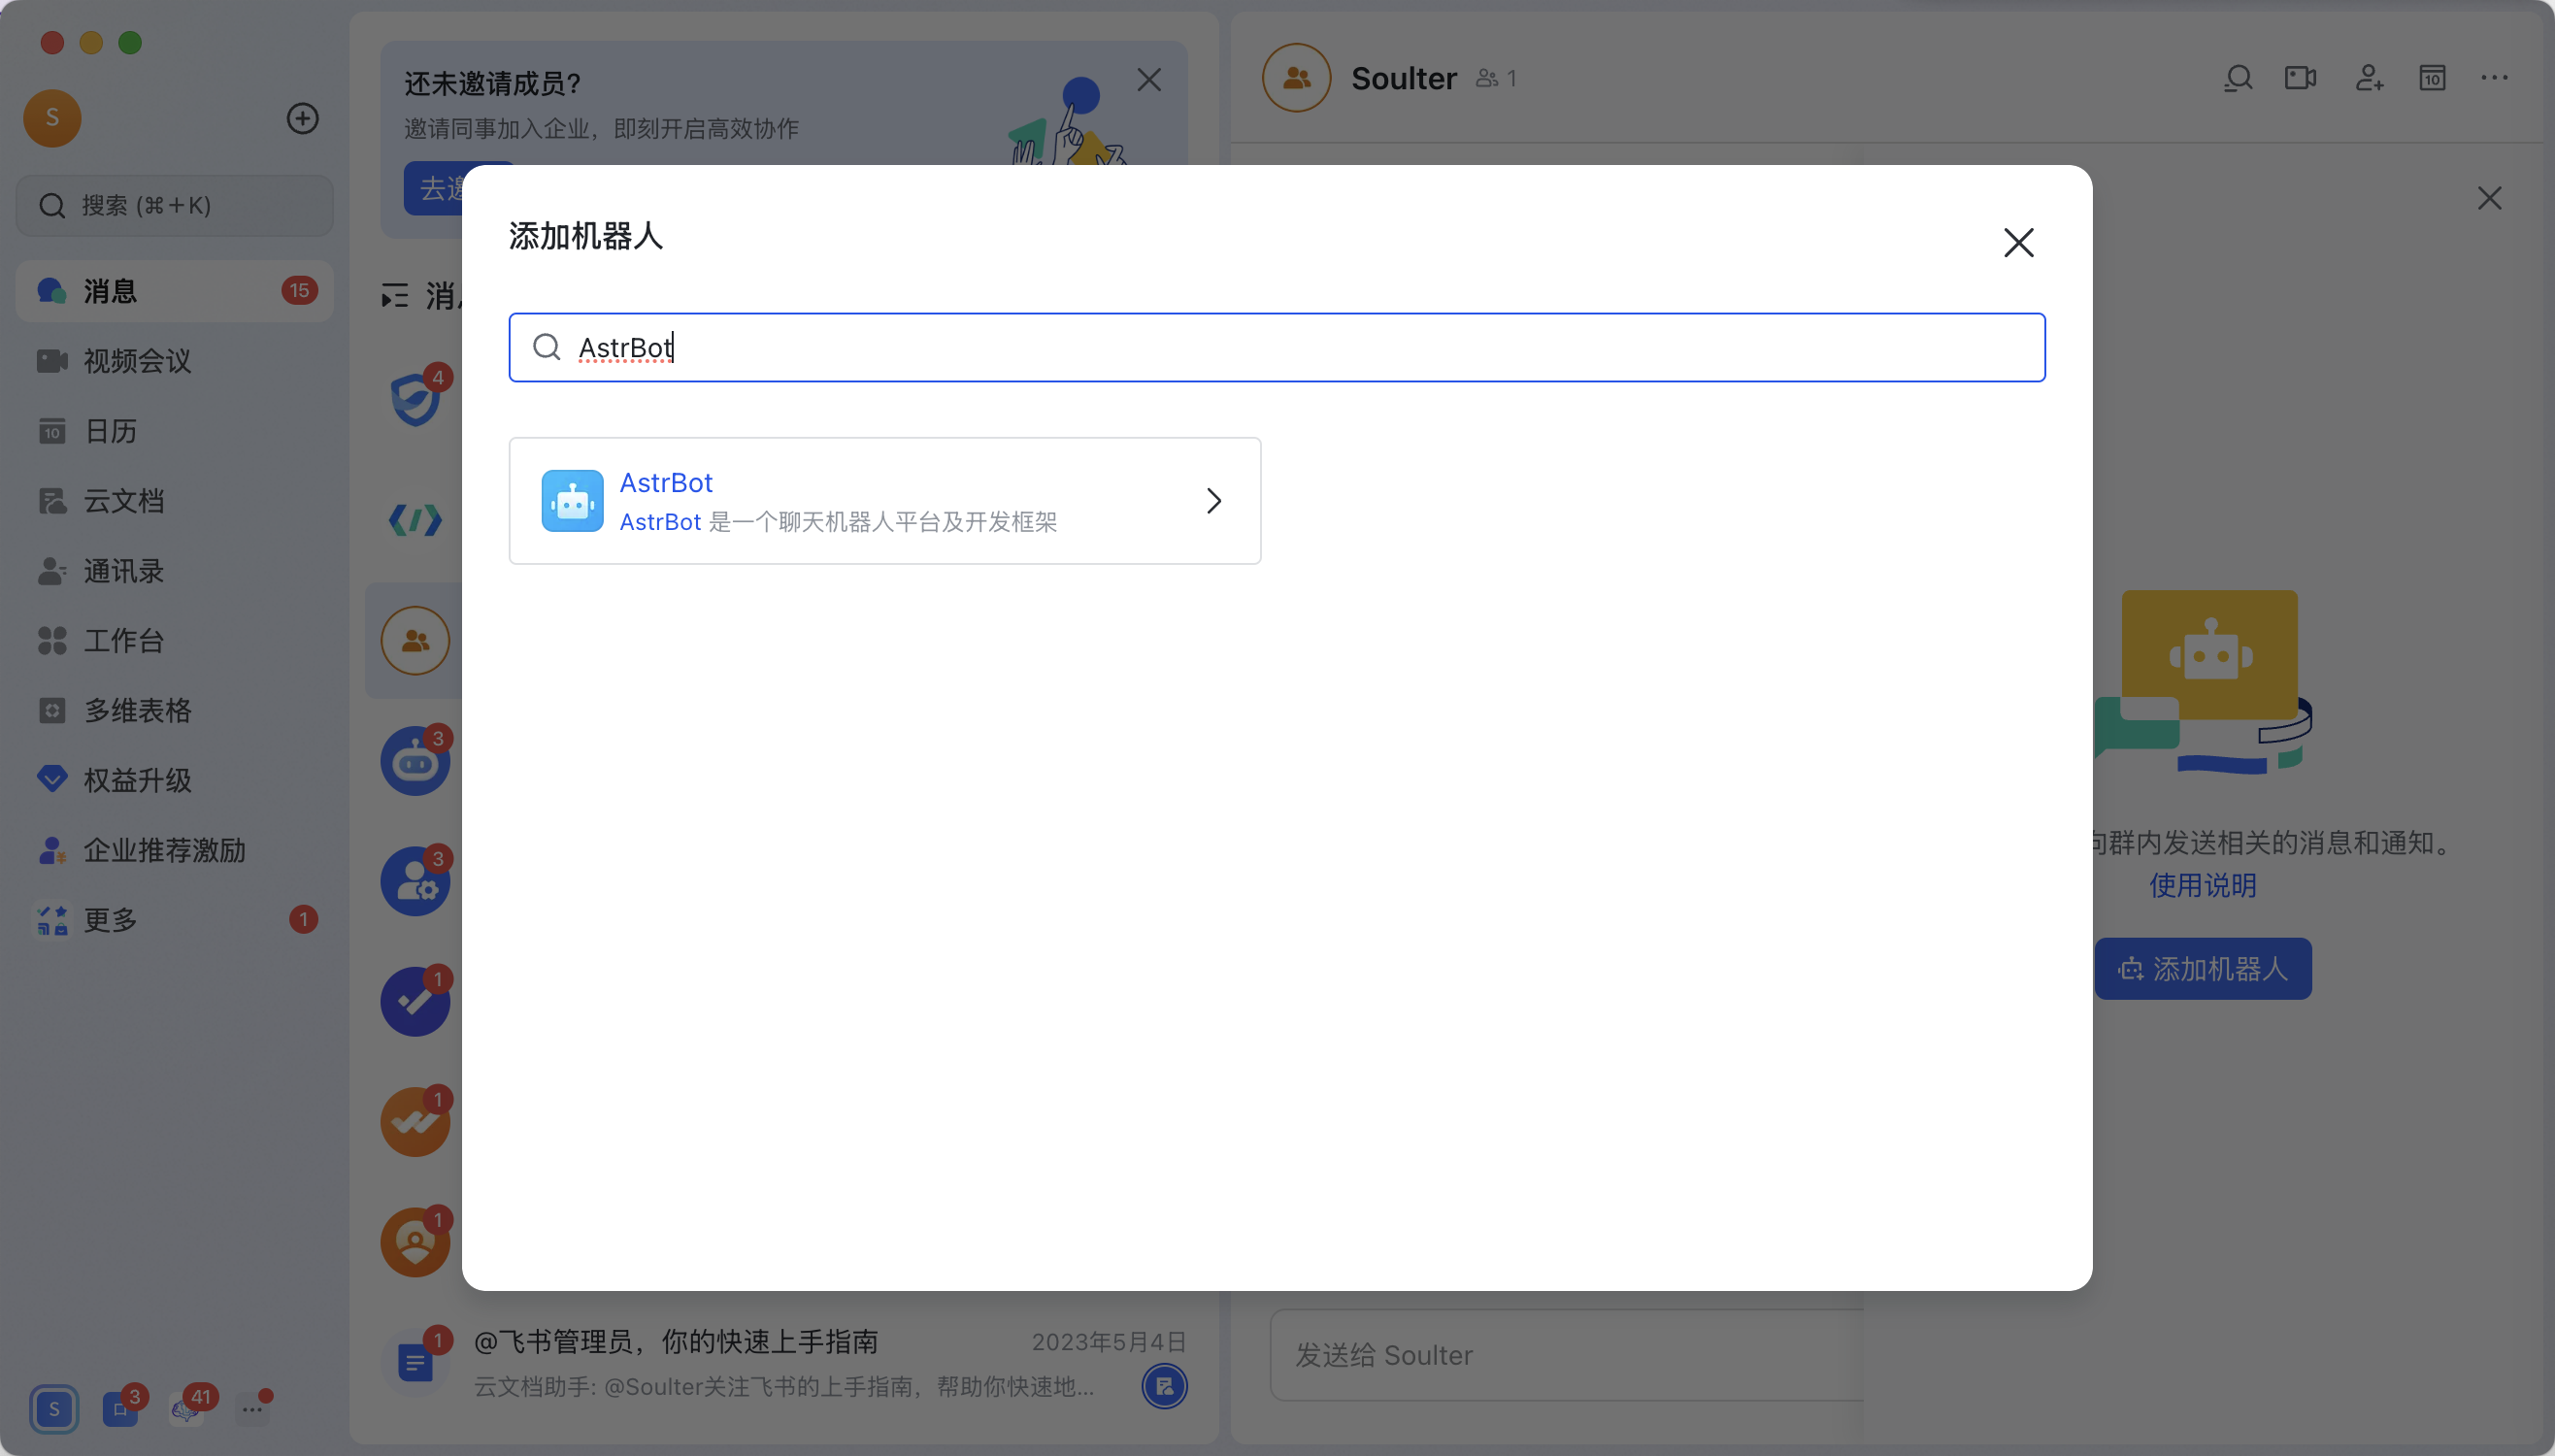
Open the Lark app (the web version doesn't support adding bots), enter a group chat, click the button in the upper right corner → Group Bots → Add Bot.
|
|
|
|
Search for the bot you just created. For example, if you created the `AstrBot` bot as shown in this tutorial:
|
|
|
|
|
|
|
|
## 🎉 All Done!
|
|
|
|
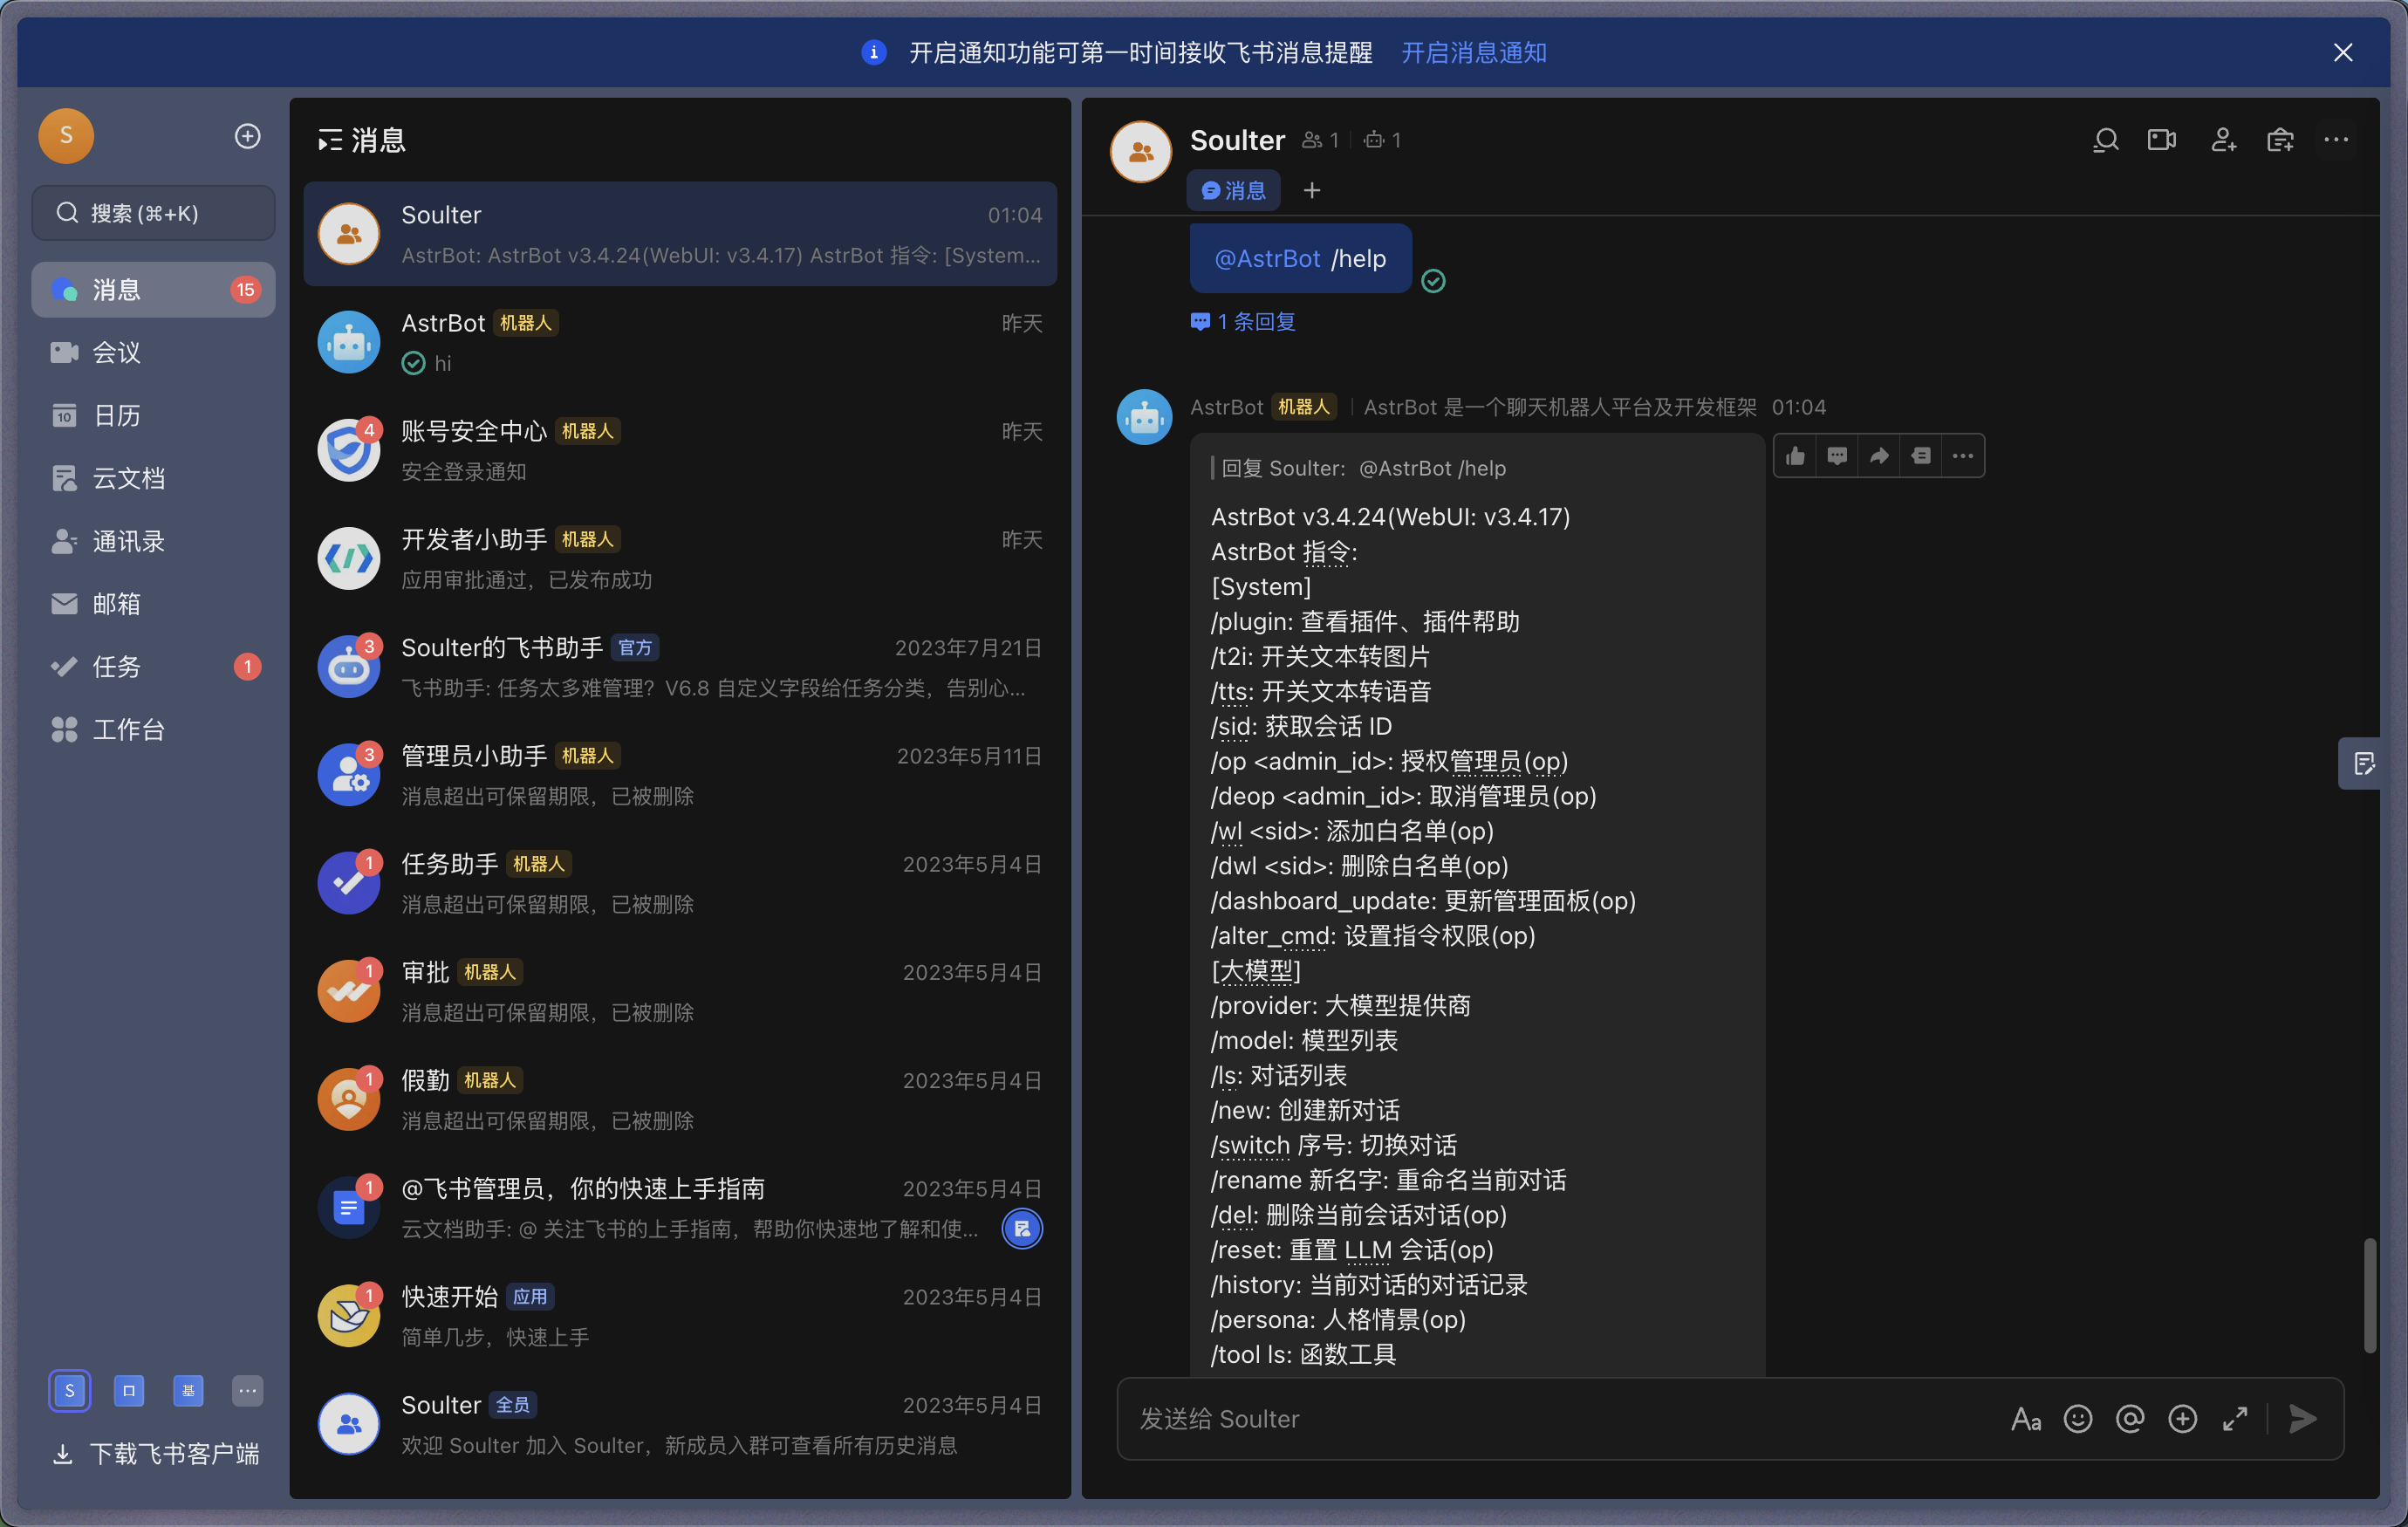
Send a `/help` command in the group, and the bot will respond.
|
|
|
|
|