mirror of
https://github.com/AstrBotDevs/AstrBot
synced 2026-07-16 01:40:15 +08:00

185 lines
7.3 KiB
Markdown
185 lines
7.3 KiB
Markdown
# FAQ
|
||
|
||
## 管理面板相关
|
||
|
||
### 当管理面板打开时遇到 404 错误
|
||
|
||
在 [release](https://github.com/AstrBotDevs/AstrBot/releases) 页面下载 `AstrBot-vxxxxx-dashboard.zip`,解压拖到 `AstrBot/data` 下。还不行请重启电脑(来自群里的反馈)
|
||
|
||
|
||
### 首次登录的默认账号和随机密码
|
||
|
||
首次启动时,WebUI 的默认账号为 `astrbot`,默认密码会随机生成,不会写死为固定值。请在启动日志中查找以下内容并使用日志中的随机初始密码登录:
|
||
|
||
```text
|
||
[00:27:40.590] [Core] [INFO] [dashboard.server:523]:
|
||
✨✨✨
|
||
AstrBot v4.24.3 WebUI is ready
|
||
|
||
➜ Local: http://localhost:6185
|
||
➜ Initial username: astrbot
|
||
➜ Initial password: UiYVpZxnW8k22IWqf0ru5pOy
|
||
➜ Change it after logging in
|
||
✨✨✨
|
||
Set dashboard.host in data/cmd_config.json to enable remote access.
|
||
```
|
||
|
||
其中的 `UiYVpZxnW8k22IWqf0ru5pOy` 就是默认密码。在使用默认密码登录后,会自动进入设置账户环节。
|
||
|
||
### 管理面板的密码忘记了
|
||
|
||
如果你忘记了 AstrBot 管理面板的密码,你可以直接使用CLI工具`astrbot password`来更改密码
|
||
|
||
另外,你也可以在 `AstrBot/data/cmd_config.json` 配置文件中找到 `"dashboard"` 字段,如下:
|
||
|
||
```json
|
||
"dashboard": {
|
||
"enable": true,
|
||
"username": "astrbot",
|
||
"password": "81e0c3dxxxxxxxxxxx78862e78",
|
||
"pbkdf2_password": "pbkdf2_sha256$600000$1xxxxxxxxxxxxxxxxxxxxxxxxxxxxxxxxxxxxxxxxxxxxxxxxxx",
|
||
"password_storage_upgraded": true,
|
||
"password_change_required": true,
|
||
"jwt_secret": "5e1b0280bcxxxxxxxxxxxxxxxxf4a",
|
||
"host": "127.0.0.1",
|
||
"port": 6185,
|
||
"disable_access_log": true,
|
||
"ssl": {
|
||
"enable": false,
|
||
"cert_file": "",
|
||
"key_file": "",
|
||
"ca_certs": ""
|
||
}
|
||
},
|
||
```
|
||
|
||
删除 `username`, `password`, `pbkdf2_password`, `password_storage_upgraded`, `password_change_required`, `jwt_secret` 六个字段(连同值一起),然后保存。上述片段修改类似如下:
|
||
|
||
|
||
```json
|
||
"dashboard": {
|
||
"enable": true,
|
||
"host": "127.0.0.1",
|
||
"port": 6185,
|
||
"disable_access_log": true,
|
||
"ssl": {
|
||
"enable": false,
|
||
"cert_file": "",
|
||
"key_file": "",
|
||
"ca_certs": ""
|
||
}
|
||
},
|
||
```
|
||
|
||
重启后 AstrBot 将会自动生成随机的密码以及固定的用户名 `astrbot`,请在日志查看。
|
||
|
||
### 升级 AstrBot 后密码正确但无法登录
|
||
|
||
如果你确认管理面板密码正确,但升级 AstrBot 后仍然无法登录,可能是旧版 WebUI 静态文件缓存与新版后端不兼容。
|
||
|
||
解决方案:
|
||
|
||
1. 停止 AstrBot。
|
||
2. 删除 AstrBot 的 `data` 目录下的 `dist` 文件夹,即 `AstrBot/data/dist`。
|
||
3. 重新启动 AstrBot。
|
||
4. 访问管理面板后按 `Ctrl+Shift+R` 或 `Ctrl+F5`(macOS 用户请按 `Cmd+Shift+R`)强制刷新页面。
|
||
|
||
重启后,AstrBot 会重新加载或下载匹配当前版本的 WebUI 文件。
|
||
|
||
## AstrBot 使用相关
|
||
|
||
### 如何让 AstrBot 控制我的 Mac / Windows / Linux 电脑?
|
||
|
||
1. 在 AstrBot WebUI 的 `配置 -> 普通配置` 中,找到 `使用电脑能力`,运行环境选择 `local`。
|
||
2. 在 `配置 -> 其他配置` 中,找到 `管理员 ID 列表`,添加你的用户 ID(可以通过 `/sid` 指令获取)。
|
||
3. 右下角保存配置
|
||
|
||
> [!TIP]
|
||
> AstrBot 为了安全起见,运行环境选择 `local` 时,默认仅允许 AstrBot 管理员使用电脑能力。
|
||
> 运行环境可以选择 `sandbox`,此时所有用户都可以使用电脑能力(在一个隔离的沙箱中)。详情请看 [AstrBot 沙箱环境](/use/astrbot-agent-sandbox.md)
|
||
|
||
### 通过 AstrBot 桌面客户端安装的 AstrBot,data 目录在哪?
|
||
|
||
在家目录下的 `.astrbot` 目录下。
|
||
|
||
- Windows: `C:\Users\你的用户名\.astrbot`
|
||
- MacOS / Linux: `/Users/你的用户名/.astrbot` 或者 `/home/你的用户名/.astrbot`
|
||
|
||
### 通过 AstrBot Launcher 安装的 AstrBot,data 目录在哪?
|
||
|
||
如果是旧版本的 AstrBot Launcher(Powershell),data 目录就在 Launcher bat 脚本的同级目录下。
|
||
|
||
如果是新版本的 AstrBot Launcher(可视化),data 目录在家目录下的 `.astrbot_launcher` 目录下。
|
||
|
||
- Windows: `C:\Users\你的用户名\.astrbot_launcher`
|
||
- MacOS / Linux: `/Users/你的用户名/.astrbot_launcher` 或者 `/home/你的用户名/.astrbot_launcher`
|
||
|
||
### 机器人在群聊无法聊天
|
||
|
||
1. 群聊情况下,由于防止消息泛滥,不会对每条监听到的消息都回复,请尝试 @ 机器人或者使用唤醒词来聊天,比如默认的 `/`,输入 `/你好`。
|
||
|
||
### 没有权限操作管理员指令
|
||
|
||
1. `/name, /provider, /dashboard_update, /op, /deop, /persona, /llm, /plugin, /model, /groupnew` 等是默认的管理员指令。可以通过 `/sid` 指令得到用户的 ID,然后在 `配置` -> `其他配置` 中添加到管理员 ID 名单中。
|
||
|
||
### 本地渲染 Markdown 图片(t2i)时中文乱码
|
||
|
||
可以自定义字体。详见 -> [#957](https://github.com/AstrBotDevs/AstrBot/issues/957#issuecomment-2749981802)
|
||
|
||
推荐 [Maple Mono](https://github.com/subframe7536/maple-font) 字体。
|
||
|
||
### API 返回的 completion 无法解析
|
||
|
||
这是由于供应商的 API 返回了空文本,尝试以下步骤:
|
||
|
||
1. 检查 API Key 是否仍然有效
|
||
2. 检查是否达到 API 调用限制或配额
|
||
3. 检查网络连接
|
||
4. 尝试 `reset`
|
||
5. 降低最大对话次数设置
|
||
6. 切换使用同一供应商的其他模型,或不同供应商的模型
|
||
|
||
## 插件相关
|
||
|
||
### 插件安装不上
|
||
|
||
1. 插件通过 GitHub 安装,在国内访问 GitHub 确实有时候连不上。可以挂代理,然后进入 `其他配置` -> `HTTP 代理` 设置代理,或者直接下载插件压缩包后上传。
|
||
|
||
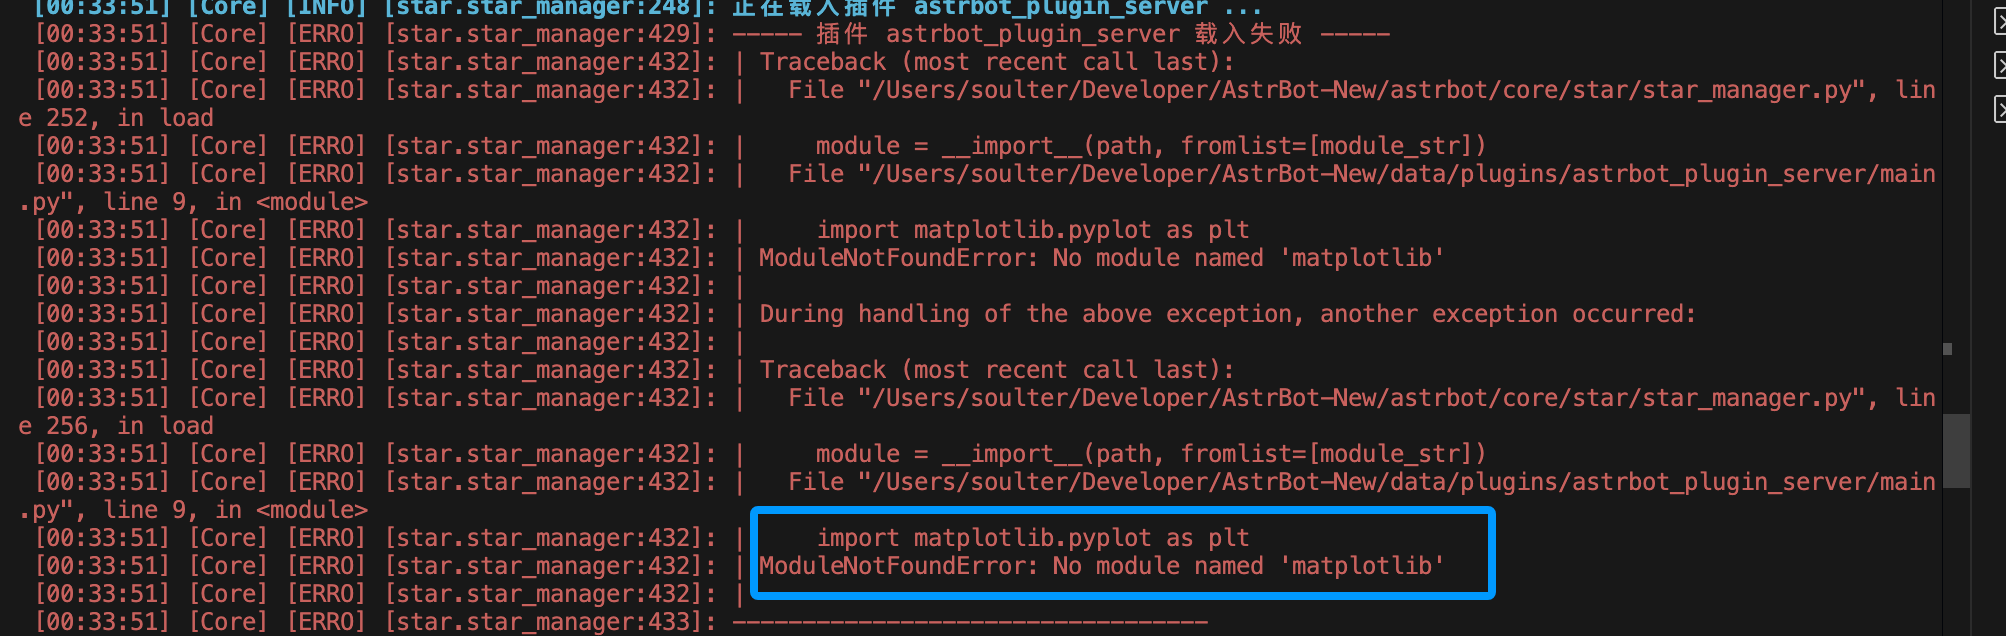
### 安装插件后报错 `No module named 'xxx'`
|
||
|
||
|
||
|
||
这个是因为插件依赖的库没有被正常安装。一般情况下,AstrBot 会在安装好插件后自动为插件安装依赖库,如果出现了以下情况可能造成安装失败:
|
||
|
||
1. 网络问题导致依赖库无法下载
|
||
2. 插件作者没有填写 `requirements.txt` 文件
|
||
3. Python 版本不兼容
|
||
|
||
解决方法:
|
||
|
||
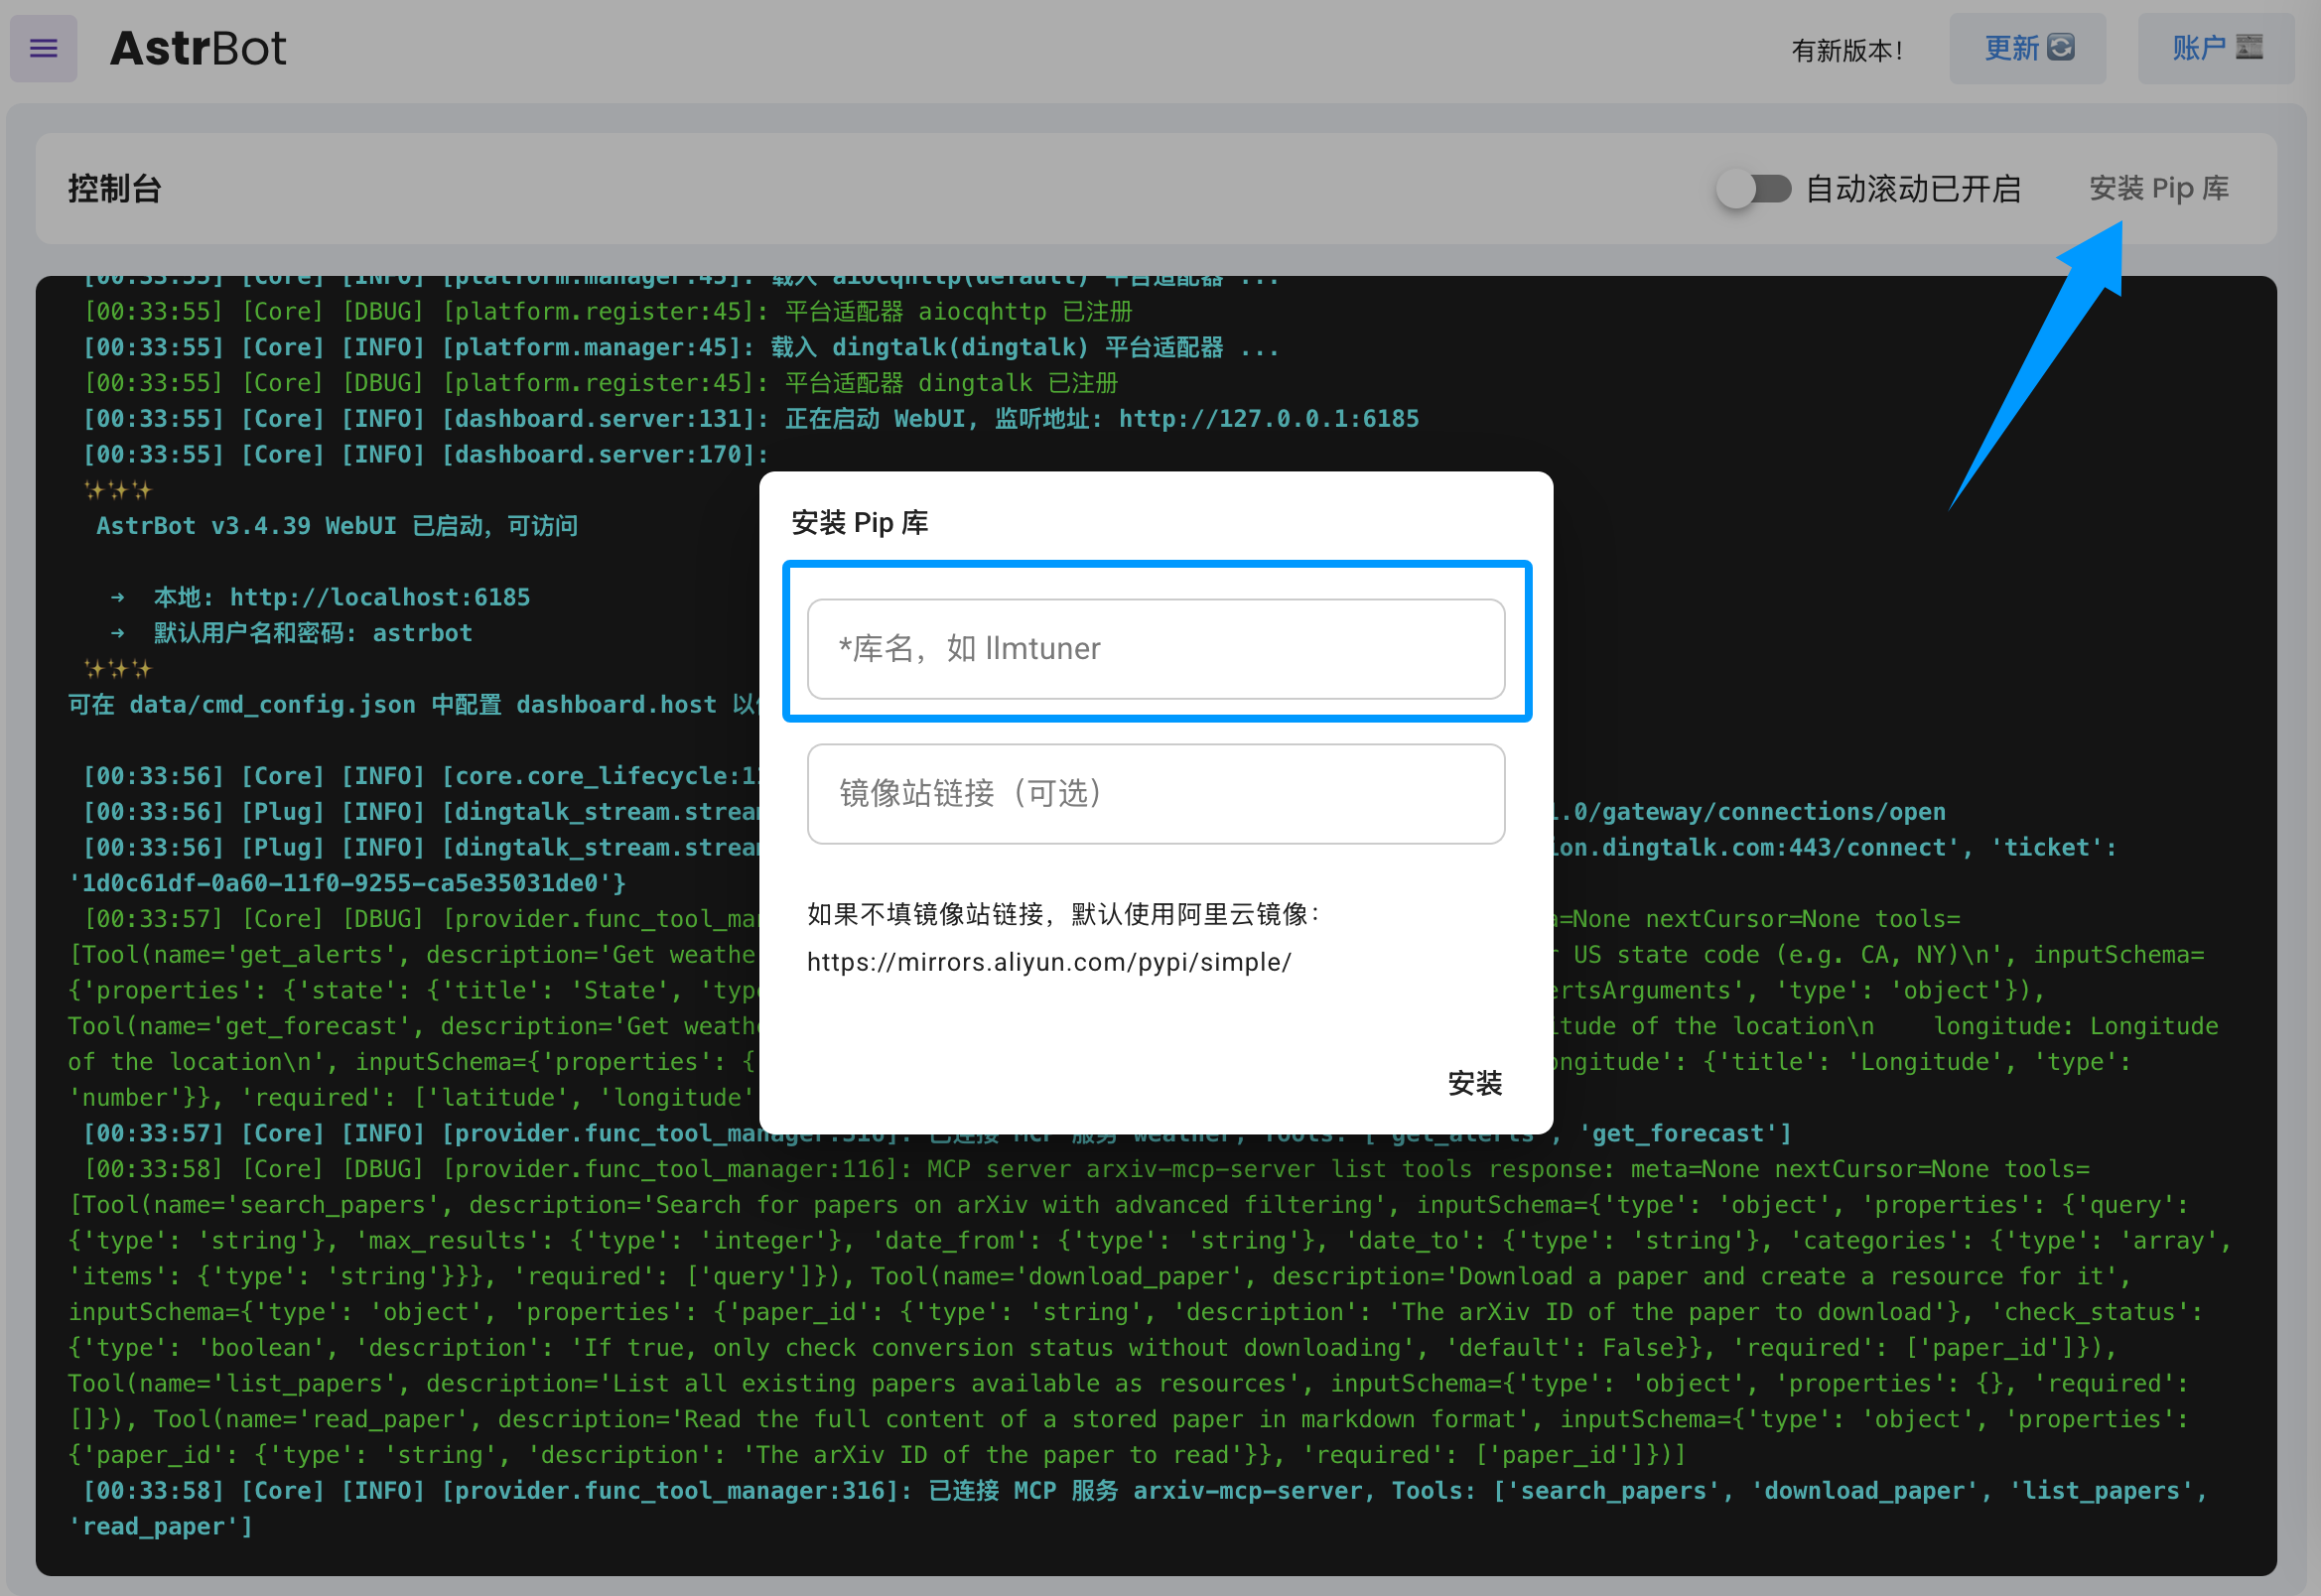
结合报错信息,参考插件的 README 手动安装依赖库。你可以在 AstrBot WebUI 的 `平台日志` -> `安装 Pip 库` 中安装依赖库。
|
||
|
||
|
||
|
||
如果发现插件作者没有填写 `requirements.txt` 文件,请在插件仓库提交 Issue,提醒作者补充。
|
||
|
||
|
||
## OneBot v11 实现端 NapCat 连接相关
|
||
|
||
### 我明明按照文档的步骤做了,为什么 NapCat 连不上 Astrbot?
|
||
|
||
1. 如果你两个**全都**是使用 Docker 部署,请尝试在终端运行:
|
||
|
||
```bash
|
||
sudo docker network create newnet # 创建新网络
|
||
sudo docker network connect newnet astrbot
|
||
sudo docker network connect newnet napcat # 让两个容器连到一起
|
||
sudo docker restart astrbot
|
||
sudo docker restart napcat # 重启容器
|
||
```
|
||
|
||
运行无报错则回到 NapCat 的 WebUI,网络配置中,将你之前填写的 `ws://127.0.0.1:6199/ws` 修改为 `ws://astrbot:6199/ws`。
|
||
|
||
2. 如果只有 NapCat 是 Docker 部署,请将 NapCat 的 WebUI 网络配置中的 `ws://127.0.0.1:6199/ws` 修改为 `ws://宿主机IP:6199/ws`(宿主机 IP 请自行搜索如何查看)。
|
||
3. 如果都不是 Docker 部署,则请将 NapCat 的 WebUI 网络配置中的 `ws://127.0.0.1:6199/ws` 修改为 `ws://localhost:6199/ws` 或 `ws://127.0.0.1:6199/ws`。
|