mirror of
https://github.com/MaaAssistantArknights/MaaAssistantArknights.git
synced 2026-07-16 01:40:46 +08:00
 67bbf9aac5
Co-authored-by: wlwxj <d1ve_wh4le@outlook.com>
Co-authored-by: Rbqwow <55343783+Rbqwow@users.noreply.github.com>
Co-authored-by: Constrat <56174894+Constrat@users.noreply.github.com>
Co-authored-by: HX3N <scarlet7518@gmail.com>
Co-authored-by: Wallsman <63186641+wallsman@users.noreply.github.com>
Co-authored-by: Loong <wangl.cc@outlook.com>
Co-authored-by: 神代綺凛 <i@loli.best>
Co-authored-by: SherkeyXD <57581480+SherkeyXD@users.noreply.github.com>
115 lines
4.8 KiB
Markdown
115 lines
4.8 KiB
Markdown
---
|
|
order: 1
|
|
icon: iconoir:developer
|
|
---
|
|
|
|
# Getting Started with Development
|
|
|
|
## Introduction to GitHub Pull Request flow
|
|
|
|
### I don't know programming but just want to modify some JSON files/documents, how can I do it?
|
|
|
|
Welcome to the [GitHub Pull Request Tutorial](./pr-tutorial.md) that anyone can understand (purely web-based on Github.com)
|
|
|
|
### I can program, but I've never used GitHub/C++/..., what can I do?
|
|
|
|
1. If you have forked this repository a long time ago, please go to `Settings`, scroll down to the bottom, and click `Delete Repository`.
|
|
2. Go to [MAA main repository](https://github.com/MaaAssistantArknights/MaaAssistantArknights) and click `Fork`, then `Create fork`.
|
|
3. Clone the `dev` branch of the (forked) repository to local with submodules:
|
|
|
|
```bash
|
|
git clone --recurse-submodules <link to your forked repo> -b dev
|
|
```
|
|
|
|
If you are using a Git GUI such as Visual Studio that does not include `--recurse-submodules`, do `git submodule update --init` after cloning to clone the submodules.
|
|
|
|
4. Download pre-built third-party libraries
|
|
|
|
**A Python environment is required; please search for a Python installation tutorial if needed.**
|
|
|
|
```cmd
|
|
python maadeps-download.py
|
|
```
|
|
|
|
5. Configure development environment
|
|
|
|
1. Download and install `Visual Studio 2022 Community`. During installation, select `Desktop development with C++` and `.NET Desktop Development`.
|
|
|
|
6. Double-click to open the file `MAA.sln`. Visual Studio will load the project automatically.
|
|
7. Run a build to test whether the development environment has been configured correctly. Choose `Release` & `x64`, right-click `MaaWpfGui` to set it as the startup project, and run it. If the build is successful, the `MaaWpfGui` window will appear. You can connect to the emulator in order to confirm again that the development environment has been configured correctly.
|
|
8. Now you are free to contribute to MAA.
|
|
9. Remember to commit once you have proper number of changes. Don't forget to write a commit message.
|
|
|
|
If you are a beginner of git, you might want to make changes on a newly created branch instead of committing to `dev` directly
|
|
|
|
```bash
|
|
git branch your_own_branch
|
|
git checkout your_own_branch
|
|
```
|
|
|
|
so that your new commits would grow on the new branch, without being interrupted by updates of `dev`
|
|
|
|
10. After development, push your local changes to the remote (your own repository).
|
|
|
|
```bash
|
|
git push origin dev
|
|
```
|
|
|
|
11. Go to [MAA repository](https://github.com/MaaAssistantArknights/MaaAssistantArknights) and submit a Pull Request. Wait until the administrator approves it. Please note that the changes should be based on `dev` instead of `master` branch, and should be merged to `dev` branch as well.
|
|
12. When there are changes from other contributors on upstreaming MAA repository, it might be necessary for you to add them to your own branch.
|
|
1. Add MAA upstream repository.
|
|
|
|
```bash
|
|
git remote add upstream https://github.com/MaaAssistantArknights/MaaAssistantArknights.git
|
|
```
|
|
|
|
2. Fetch upstream changes from the repository.
|
|
|
|
```bash
|
|
git fetch upstream
|
|
```
|
|
|
|
3. rebase (recommended) or merge changes.
|
|
|
|
```bash
|
|
git rebase upstream/dev
|
|
```
|
|
|
|
or
|
|
|
|
```bash
|
|
git merge
|
|
```
|
|
|
|
4. Repeat step 7-10.
|
|
|
|
Note: operations regarding Git can be done by VS2022 instead of command line tools, using the Git changes tab.
|
|
|
|
## Enable clang-format in Visual Studio
|
|
|
|
1. Install clang-format version 17 or higher.
|
|
|
|
```bash
|
|
python -m pip install clang-format
|
|
```
|
|
|
|
2. Use tools like 'Everything' to locate the installation location of clang-format.exe. As a reference, if you are using Anaconda, clang-format.exe will be installed in YourAnacondaPath/Scripts/clang-format.exe.
|
|
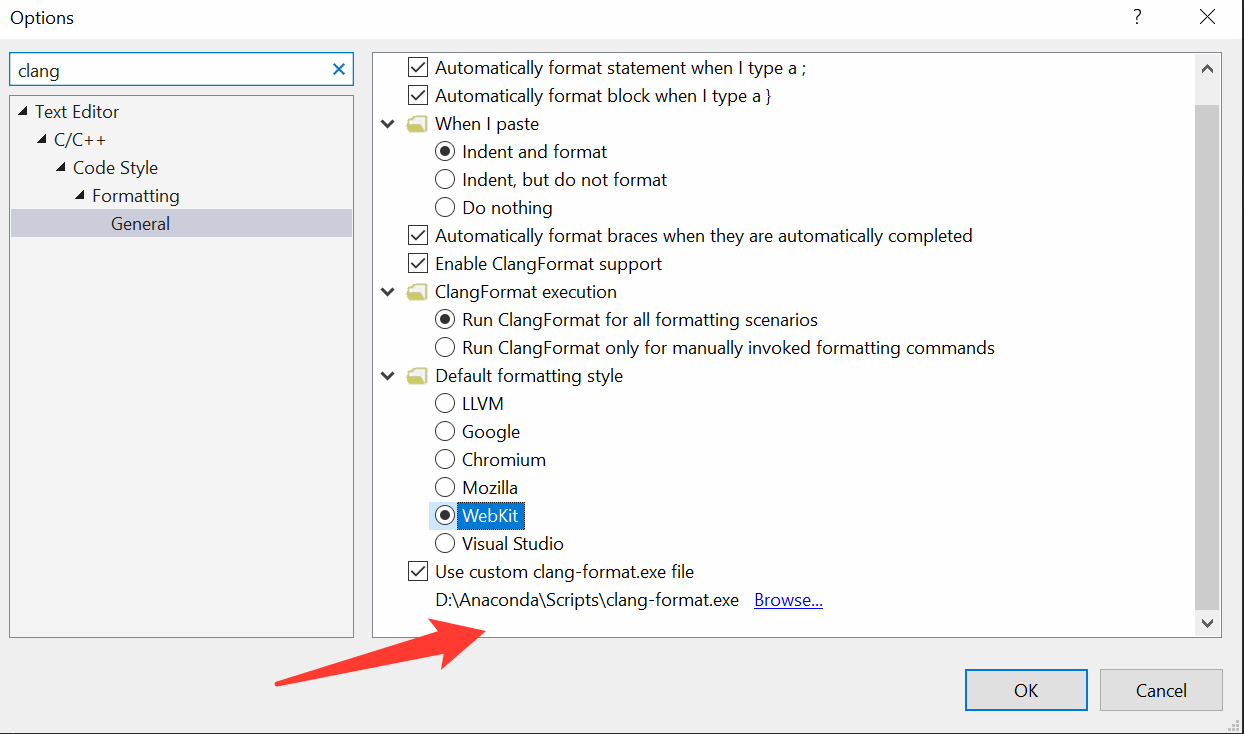
3. In Visual Studio, search for 'clang-format' in Tools-Options.
|
|
4. Click `Enable ClangFormat support` and select `Use custom clang-format.exe file` and choose the `clang-format.exe` located in Step 2.
|
|
|
|
|
|
|
|
You are all set with the clang-format integrated in Visual Studio supporting c++20 features!
|
|
|
|
You can also format with `tools\ClangFormatter\clang-formatter.py` directly, by executing in the root folder of the project:
|
|
|
|
- `python tools\ClangFormatter\clang-formatter.py --clang-format=PATH\TO\YOUR\clang-format.exe --input=src\MaaCore`
|
|
|
|
## Develop in cloud using GitHub codespace
|
|
|
|
Create GitHub codespace with pre-configured C++ dev environments:
|
|
|
|
[](https://codespaces.new/MaaAssistantArknights/MaaAssistantArknights)
|
|
|
|
Then follow the instructions in vscode or [Linux tutorial](./linux-tutorial.md) to configure GCC 12 and the CMake project.
|