mirror of
https://github.com/MaaAssistantArknights/MaaAssistantArknights.git
synced 2026-07-16 09:50:40 +08:00
 67bbf9aac5
Co-authored-by: wlwxj <d1ve_wh4le@outlook.com>
Co-authored-by: Rbqwow <55343783+Rbqwow@users.noreply.github.com>
Co-authored-by: Constrat <56174894+Constrat@users.noreply.github.com>
Co-authored-by: HX3N <scarlet7518@gmail.com>
Co-authored-by: Wallsman <63186641+wallsman@users.noreply.github.com>
Co-authored-by: Loong <wangl.cc@outlook.com>
Co-authored-by: 神代綺凛 <i@loli.best>
Co-authored-by: SherkeyXD <57581480+SherkeyXD@users.noreply.github.com>
125 lines
4.6 KiB
Markdown
125 lines
4.6 KiB
Markdown
---
|
||
order: 1
|
||
icon: iconoir:developer
|
||
---
|
||
|
||
# 开始开发
|
||
|
||
## Github Pull Request 流程简述
|
||
|
||
### 我不懂编程,只是想改一点点 JSON 文件/文档等,要怎么操作?
|
||
|
||
欢迎收看 [牛牛也能看懂的 GitHub Pull Request 使用指南](./pr-tutorial.md) (纯网页端操作 Github.com)
|
||
|
||
### 我会编程,但没接触过 GitHub/C++/……,要怎么操作?
|
||
|
||
1. 如果很久以前 fork 过,先在自己仓库的 `Settings` 里,翻到最下面,删除
|
||
2. 打开 [MAA 主仓库](https://github.com/MaaAssistantArknights/MaaAssistantArknights),点击 `Fork`,继续点击 `Create fork`
|
||
3. 克隆你自己仓库下的 dev 分支到本地,并拉取子模块
|
||
|
||
```bash
|
||
git clone --recurse-submodules <你的仓库的 git 链接> -b dev
|
||
```
|
||
|
||
::: warning
|
||
如果正在使用 Visual Studio 等不附带 `--recurse-submodules` 参数的 Git GUI,则需在克隆后再执行 `git submodule update --init` 以拉取子模块。
|
||
:::
|
||
|
||
4. 下载预构建的第三方库
|
||
|
||
**需要有 Python 环境,请自行搜索 Python 安装教程**
|
||
_(maadeps-download.py 文件在项目根目录)_
|
||
|
||
```cmd
|
||
python maadeps-download.py
|
||
```
|
||
|
||
5. 配置编程环境
|
||
|
||
- 下载并安装 `Visual Studio 2022 community`, 安装的时候需要选中 `基于c++的桌面开发` 和 `.NET桌面开发`。
|
||
|
||
6. 双击打开 `MAA.sln` 文件,Visual Studio 会自动加载整个项目。
|
||
7. 设置 VS
|
||
|
||
- VS 上方配置选择 `RelWithDebInfo` `x64` (如果编译 Release 包 或 ARM 平台,请忽略这步)
|
||
- 右键 `MaaWpfGui` - 属性 - 调试 - 启用本地调试(这样就能把断点挂到 C++ Core 那边了)
|
||
|
||
8. 到这里,你就可以愉快地 ~~瞎 JB 改~~ 发电了
|
||
9. 开发过程中,每一定数量,记得提交一个 commit, 别忘了写上 message
|
||
假如你不熟悉 git 的使用,你可能想要新建一个分支进行更改,而不是直接提交在 `dev` 上
|
||
|
||
```bash
|
||
git branch your_own_branch
|
||
git checkout your_own_branch
|
||
```
|
||
|
||
这样你的提交就能在新的分支上生长,不会受到 `dev` 更新的打扰
|
||
|
||
10. 完成开发后,推送你修改过的本地分支(以 `dev` 为例)到远程(fork 的仓库)
|
||
|
||
```bash
|
||
git push origin dev
|
||
```
|
||
|
||
11. 打开 [MAA 主仓库](https://github.com/MaaAssistantArknights/MaaAssistantArknights)。提交一个 pull request,等待管理员通过。别忘了你是在 dev 分支上修改,别提交到 master 分支去了
|
||
12. 当 MAA 原仓库出现更改(别人做的),你可能需要把这些更改同步到你的分支
|
||
|
||
1. 关联 MAA 原仓库
|
||
|
||
```bash
|
||
git remote add upstream https://github.com/MaaAssistantArknights/MaaAssistantArknights.git
|
||
```
|
||
|
||
2. 从 MAA 原仓库拉取更新
|
||
|
||
```bash
|
||
git fetch upstream
|
||
```
|
||
|
||
3. 变基(推荐)或者合并修改
|
||
|
||
```bash
|
||
git rebase upstream/dev # 变基
|
||
```
|
||
|
||
或者
|
||
|
||
```bash
|
||
git merge # 合并
|
||
```
|
||
|
||
4. 重复上述 7, 8, 9, 10 中的操作
|
||
|
||
::: tip
|
||
在打开 VS2022 之后,和 git 有关的操作可以不用命令行工具,直接使用 vs 自带的“Git 更改”即可
|
||
:::
|
||
|
||
## 在 Visual Studio 中启用 clang-format
|
||
|
||
1. 安装 clang-format 17 或更高版本
|
||
|
||
```bash
|
||
python -m pip install clang-format
|
||
```
|
||
|
||
2. 使用 Everything 等工具 找到 clang-format.exe 的安装位置。作为参考,若您使用了 Anaconda,clang-format.exe 将安装在 YourAnacondaPath/Scripts/clang-format.exe
|
||
|
||
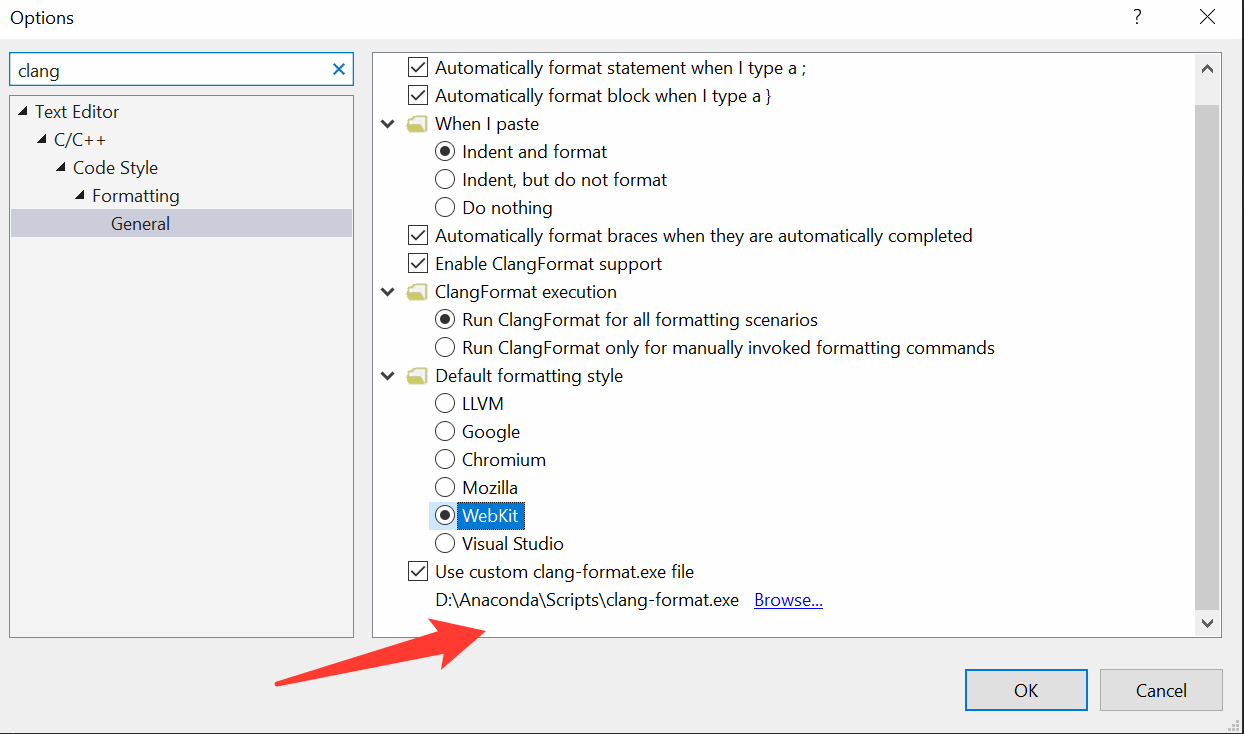
3. 在 Visual Studio `工具-选项` 中搜索 `clang-format`
|
||
4. 点击 `启用 ClangFormat 支持`,然后选择下面的 `使用自定义 clang-format.exe 文件`,选择第 2 步找到的 `clang-format.exe`
|
||
|
||
|
||
|
||
然后你的 Visual Studio 就能愉快的使用支持 c++20 语法的 clang-format 啦!
|
||
|
||
你也可以使用 `tools\ClangFormatter\clang-formatter.py` 来直接调用你的 clang-format 来进行格式化,只需要在项目根目录下执行:
|
||
|
||
- `python tools\ClangFormatter\clang-formatter.py --clang-format=PATH\TO\YOUR\clang-format.exe --input=src\MaaCore`
|
||
|
||
## 使用 GitHub codespace 进行在线开发
|
||
|
||
创建 GitHub codespace 自动配置 C++ 开发环境
|
||
|
||
[](https://codespaces.new/MaaAssistantArknights/MaaAssistantArknights)
|
||
|
||
随后根据 vscode 的提示或 [Linux 教程](./linux-tutorial.md) 配置 GCC 12 和 CMake 工程
|